IOS逆向(一)-破解某币app加密数据
最近帮朋友抓取某币圈大佬操盘的数据,但是关键数据被加密了。通过砸壳逆向分析后,用frida来hook解密函数进行抓取。逆向难度相对简单,适合入门学习。
难度
★☆☆☆☆
工具环境
- 越狱IOS 14.4
- frida-ios-dump
- frida-trace
- IDA 7.7
- HTTP Catcher
抓包分析
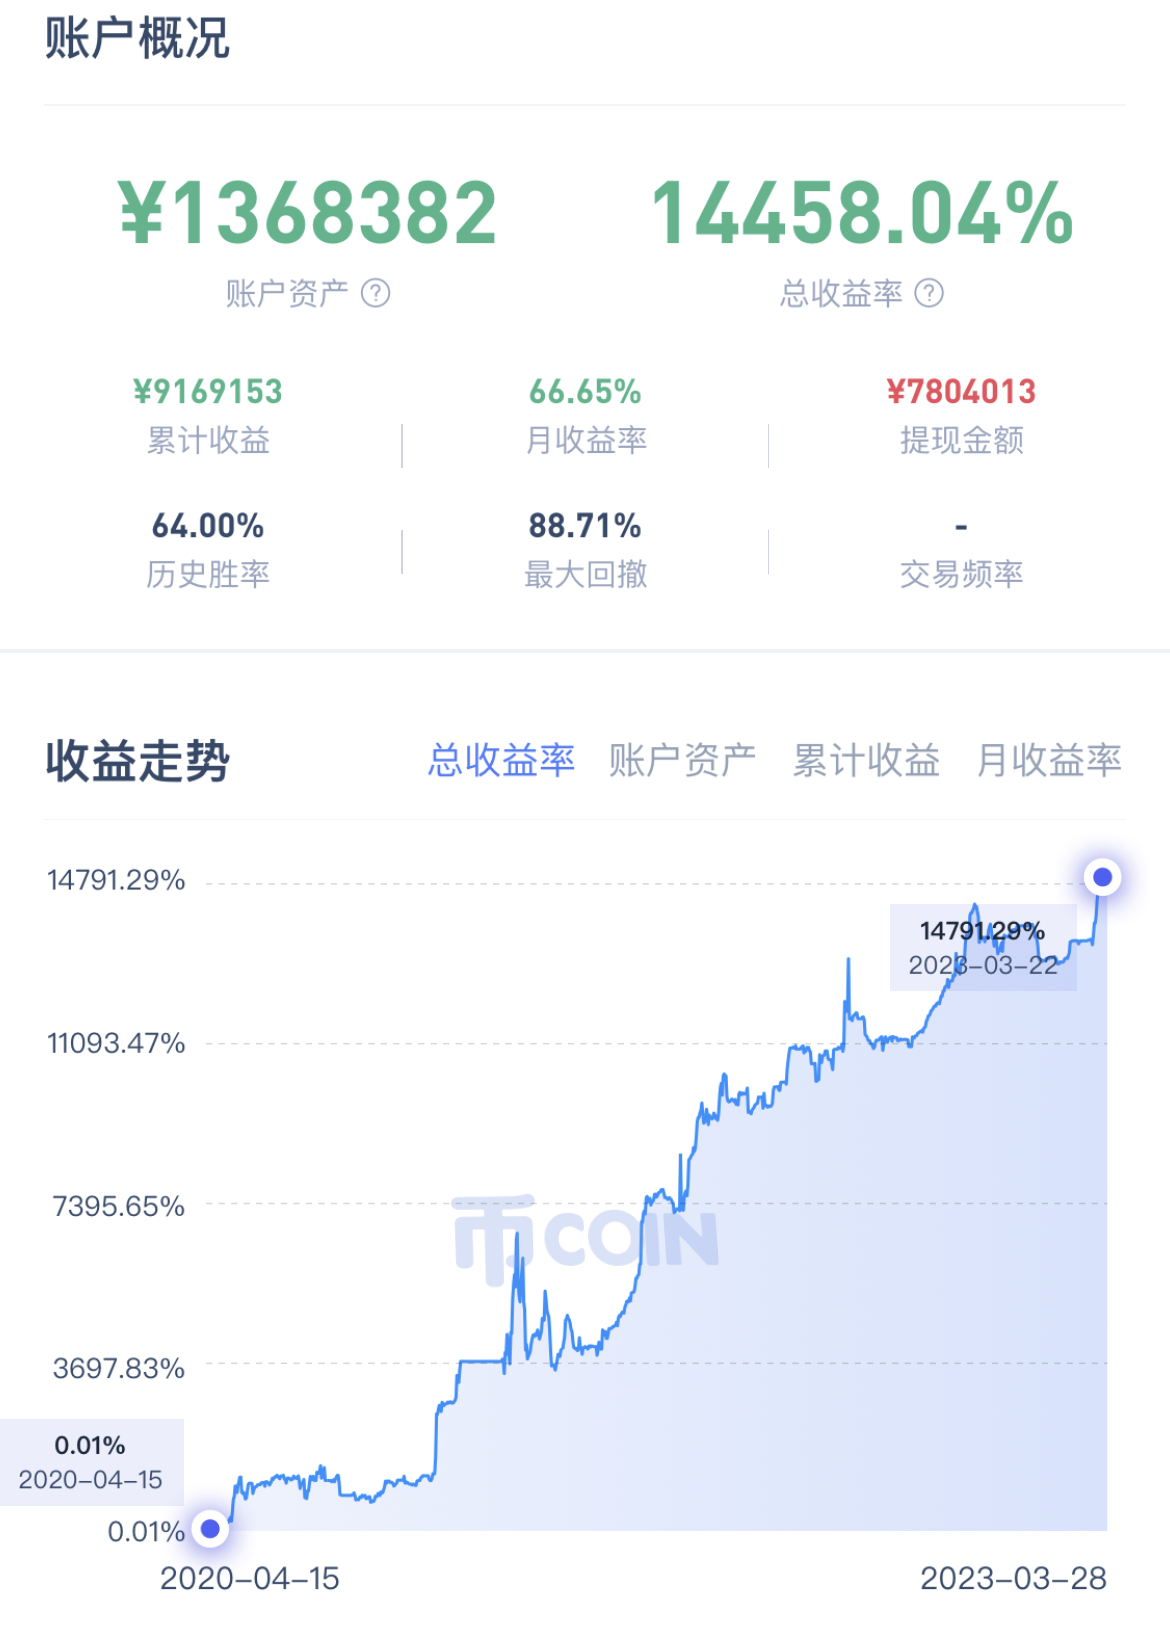
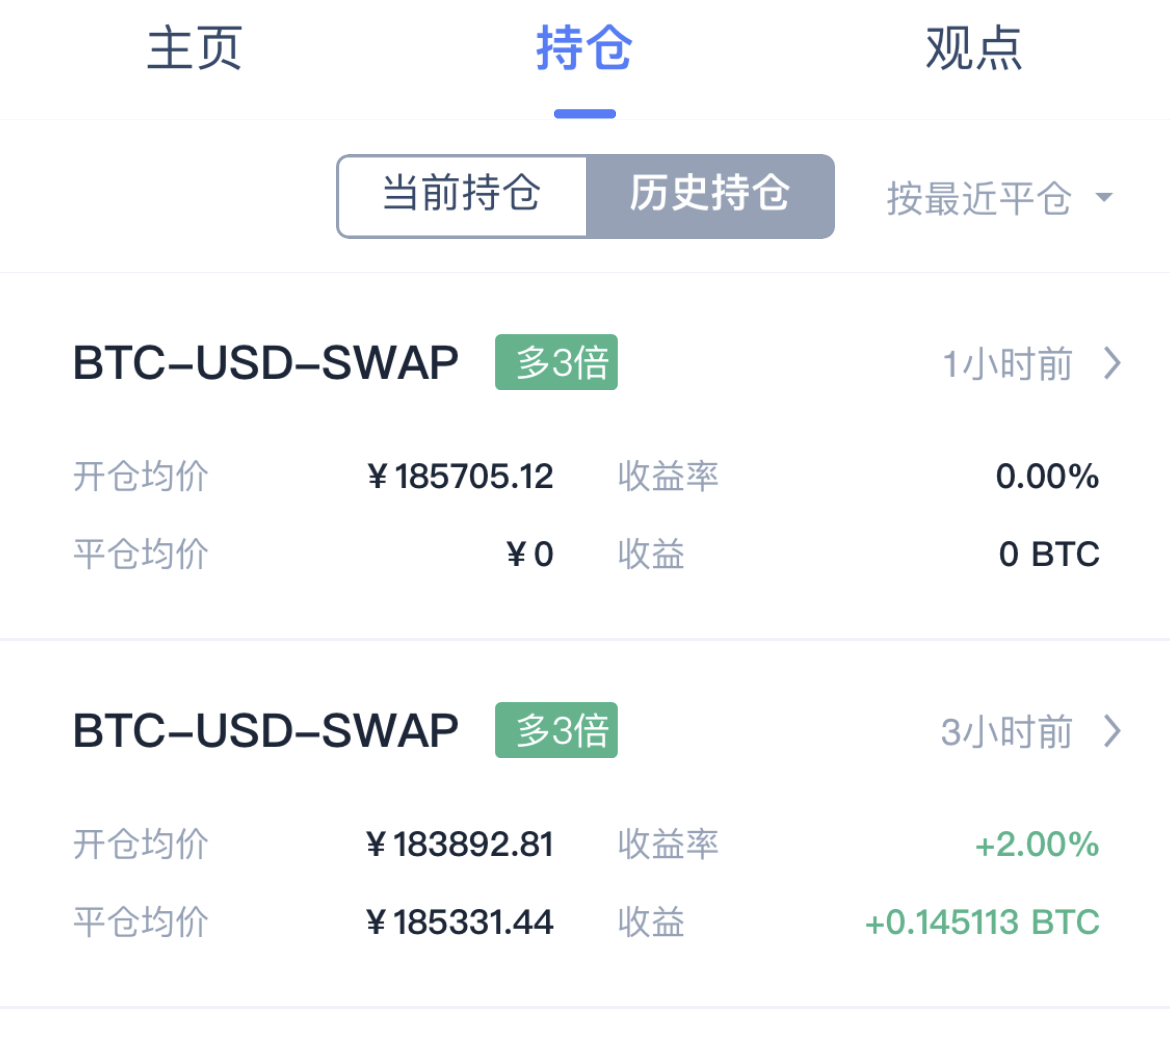
找到某币圈大佬的操盘记录,来到持仓页面进行抓包。
ios的app抓包最简单的办法就是用HTTP Cathcer,为了方便直接转发到mac上。
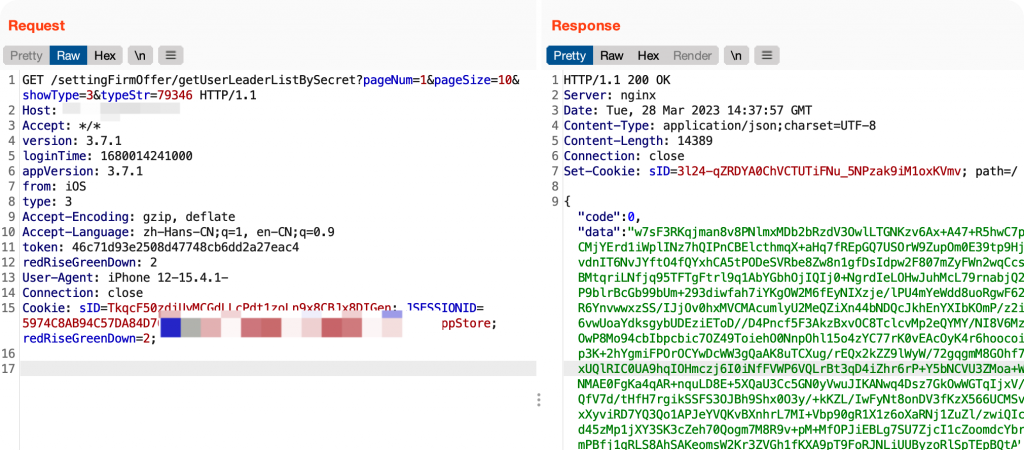
可以看到请求参数是没有加密的,但是返回的关键数据都被加密了,但是无法判断加密算法的类型。
IDA分析maco文件
这里使用frida-ios-dump进行砸壳,砸壳的过程就不说了。
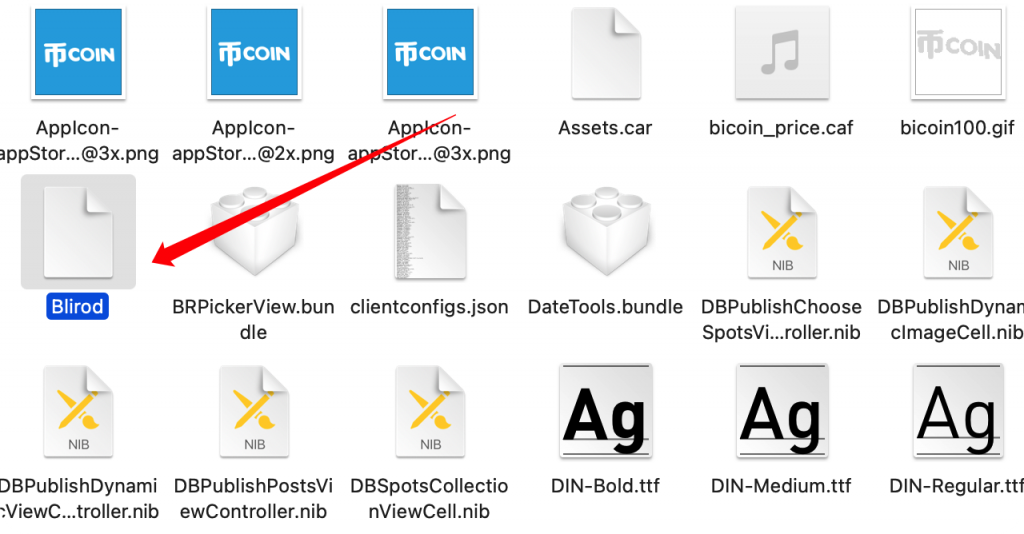
找到maco可执行文件,这类文件很明显的特征是没有后缀名。拖入IDA中分析关键加解密函数。
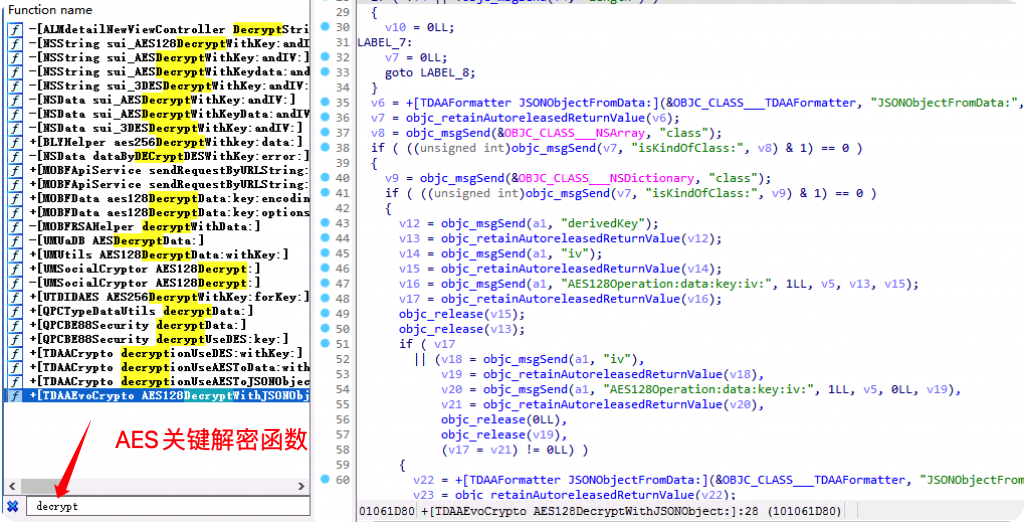
搜索decrypt关键字,很容易就定位到解密函数位置,从函数名就能看出是使用的AES加密,所以问题就简单多了。
不管代码如何封装,最终肯定是调用IOS官方的加解密函数,所以直接hook CCCrypt即可,该函数的主要参数如下。
CCCryptorStatus CCCrypt(
    CCOperation op,          /* 加密:kCCEncrypt = 0,解密:kCCDecrypt = 1 */
    CCAlgorithm alg,        / 加密算法,如kCCAlgorithmAES128等 /
    CCOptions options,      / 加密选项,如kCCOptionPKCS7Padding等 /
    const void key,       / 加密密钥 /
    size_t keyLength,      / 加密密钥长度 /
    const void iv,         / 可选的初始化向量 /
    const void dataIn,     / 可选的输入数据 /
    size_t dataInLength,    / 输入数据长度 /
    void dataOut,          / 输出数据 /
    size_t dataOutAvailable,  / 输出数据可用长度 /
    size_t dataOutMoved)   / *实际输出数据长度 */
frida-trace hook CCCrypt
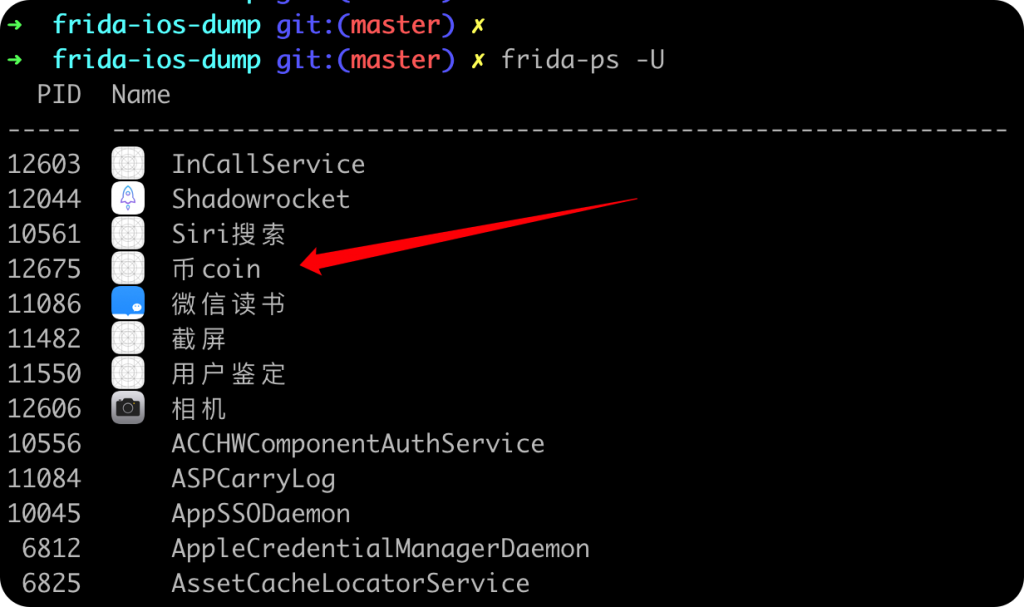
frida-ps -U
查看当前应用的包名。
下面就是直接上frida进行hook关键解密函数。
frida-trace -FU -i CCCrypt
因为当前已经在前台运行了程序,所以就不用指定包名,直接hook即可。
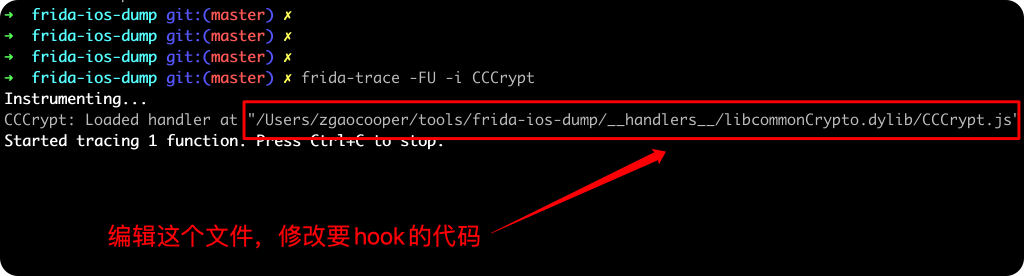
执行frida-trace之后会自动生成一个模板,需要手动修改。
{
onEnter: function (log, args, state) {
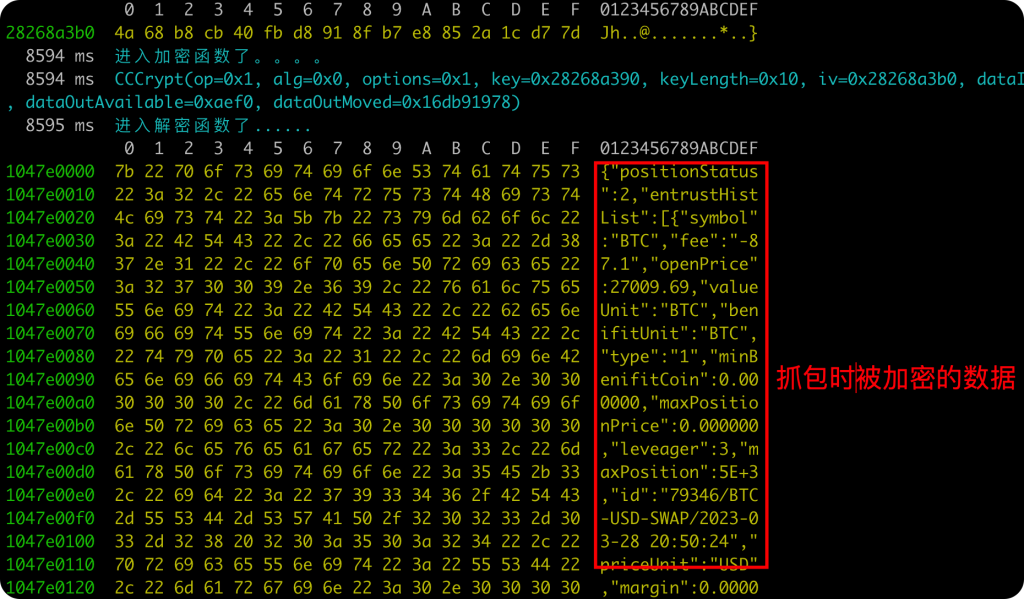
log("进入加密函数了。。。。")
log('CCCrypt(' +
'op=' + args[0] +
', alg=' + args[1] +
', options=' + args[2] +
', key=' + args[3] +
', keyLength=' + args[4] +
', iv=' + args[5] +
', dataIn=' + args[6] +
', dataInLength=' + args[7] +
', dataOut=' + args[8] +
', dataOutAvailable=' + args[9] +
', dataOutMoved=' + args[10] +
')');
//保存参数
this.operation = args[0]
this.CCAlgorithm = args[1]
this.CCOptions = args[2]
this.keyBytes = args[3]
this.keyLength = args[4]
this.ivBuffer = args[5]
this.inBuffer = args[6]
this.inLength = args[7]
this.outBuffer = args[8]
this.outLength = args[9]
this.outCountPtr = args[10]
//this.operation == 0 代表是加密
if (this.operation == 0) {
log("进入加密函数了......")
//打印加密前的原文
console.log("In buffer:")
console.log(hexdump(ptr(this.inBuffer), {
length: this.inLength.toInt32(),
header: true,
ansi: true
}))
//打印密钥
console.log("Key: ")
console.log(hexdump(ptr(this.keyBytes), {
length: this.keyLength.toInt32(),
header: true,
ansi: true
}))
//打印 IV
console.log("IV: ")
console.log(hexdump(ptr(this.ivBuffer), {
length: this.keyLength.toInt32(),
header: true,
ansi: true
}))
}
},
onLeave: function (log, retval, state) {
if (this.operation == 1) {
// Show the buffers here if this a decryption operation
log("进入解密函数了......")
console.log(hexdump(ptr(this.outBuffer), {
length: Memory.readUInt(this.outCountPtr),
header: true,
ansi: true
}))
console.log("Key: ")
console.log(hexdump(ptr(this.keyBytes), {
length: this.keyLength.toInt32(),
header: true,
ansi: true
}))
console.log("IV: ")
console.log(hexdump(ptr(this.ivBuffer), {
length: this.keyLength.toInt32(),
header: true,
ansi: true
}))
}
}
}
这段代码可以当做模板直接复用。
执行frida-trace后,来到被需要抓取的页面,就会触发解密函数。此时通过hexdump解密出来的数据就是我们需要抓取的了。
但是hexdump只是方便我们查看,如何才能直接dump字符串的内容呢?这里就需要用到Memory.readCString()来读取字符数据。
同时根据需要,最终的目的是为了抓取数据。那么我们可以把解密后的数据写入到文件中进行保存。修改代码如下:
  onLeave: function (log, retval, state) {
    if (this.operation == 1) {
      log("进入解密函数了......")
      const jsonData = Memory.readCString(ptr(this.outBuffer));
      const fileName = Math.random().toString(36).substring(7) + ".json";
      const filePath = '/tmp/coin2/' + fileName
      log(filePath)
      log(jsonData)
      var file = new File(filePath, "w");
      file.write(jsonData);
      file.flush();
      file.close();
    }
  }

踩坑-文件生成位置
由于要保存解密后的数据,所以需要写文件。因为是在mac上执行的命令,所以一开始我误以为生成文件的位置也是在本机上。于是开始debug,发现写入文件的代码既不报错也找不到生成后的文件。在这里浪费了很多时间【我裂开】。
虽然修改代码和执行frida的命令是在mac上,但是脚本最终是在ios设备上执行的,所以frida代码中生成的文件也是在ios上。
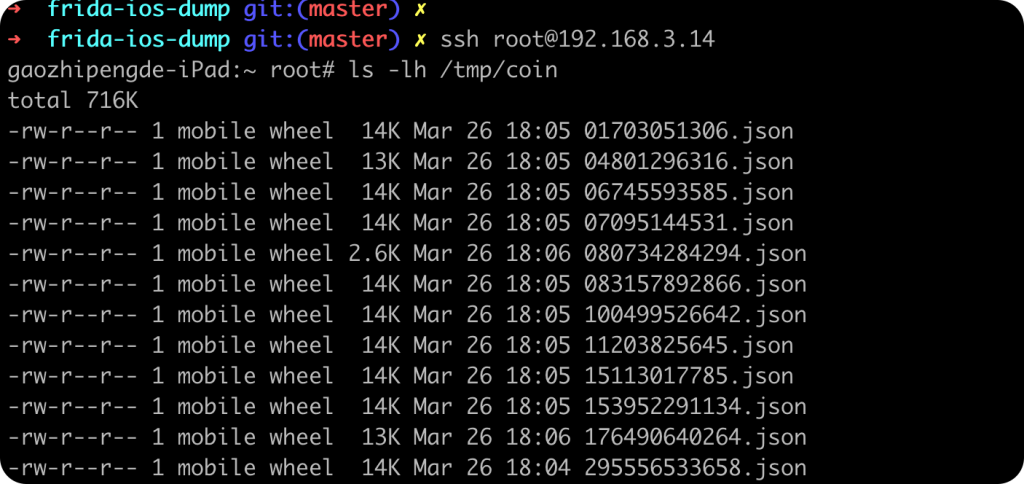
目标是抓取一个用户的操盘数据,所以也不用写脚本,直接手动刷一遍即可dump所有交易记录了。
总结
本次IOS的逆向过程非常简单,主要是目标app没有做越狱检测,也没有使用魔改的加密算法,适合新手入门学习。
赞赏 微信赞赏
微信赞赏 支付宝赞赏
支付宝赞赏
2条评论