Powershell在应急响应中的高效使用
计算机取证分析是收集和评估数字证据的过程,通常用于识别非法活动的行为。PowerShell 是基于 Windows 系统进行取证分析的强大工具,本文介绍powershell在应急响应排查过程中的高效使用技巧。
事件日志分析
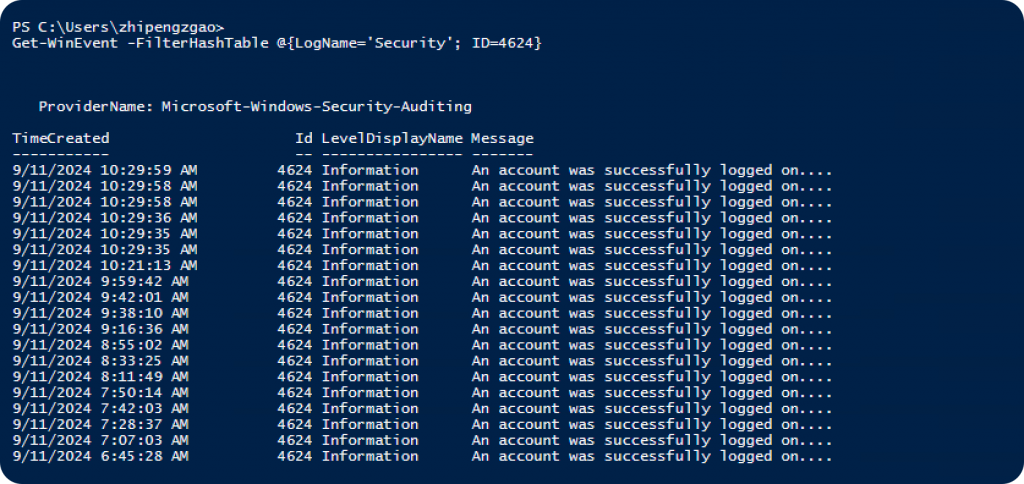
取证分析通常从检查系统日志开始。Windows 事件日志是一个重要的信息来源,可以使用 PowerShell 的 Get-WinEvent cmdlet 访问。例如,我们可以通过特定事件 ID 过滤事件以查找可疑的用户活动:
Get-WinEvent -FilterHashTable @{LogName='Security'; ID=4625}
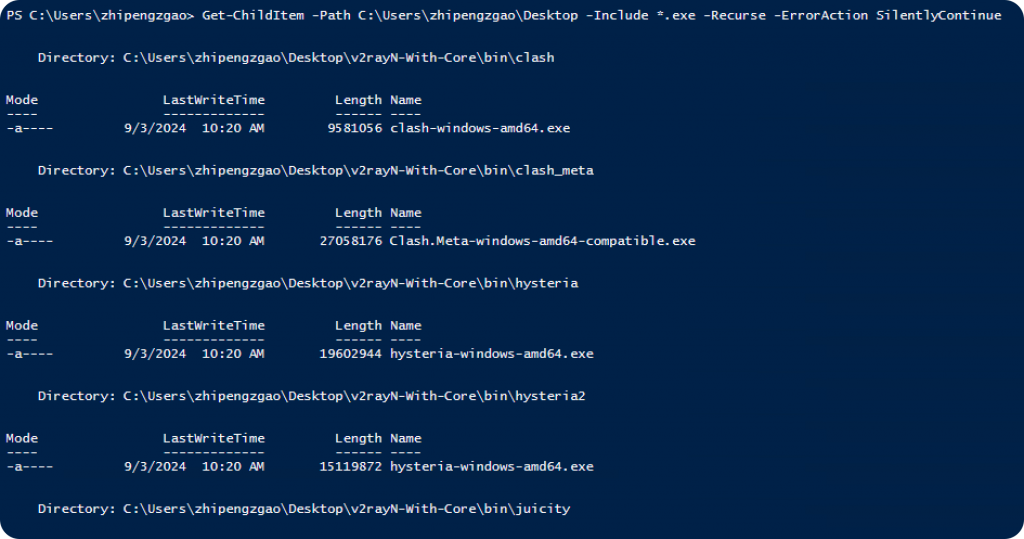
PowerShell 还可用于分析文件和文件夹。Get-ChildItem cmdlet 用于列出文件夹中的文件,这些文件可以路由到管道以对其执行操作。例如,我们可以查找具有特定文件扩展名的文件:
Get-ChildItem -Path C:\ -Include *.exe -Recurse -ErrorAction SilentlyContinue
Get-ChildItem -Path C:\ -Include *.locked -Recurse -ErrorAction SilentlyContinue
文件系统分析
在取证分析过程中识别在一定日期范围内创建/修改的文件是非常重要的一步,powershell 在这方面为我们提供了强大的工具:
$StartDate = Get-Date -Year 2024 -Month 6 -Day 1 -Hour 8 -Minute 0 -Second 0
$EndDate = Get-Date -Year 2024 -Month 8 -Day 30 -Hour 17 -Minute 0 -Second 0

Get-ChildItem -Path C:\ -Recurse |
Where-Object {$_.CreationTime -gt $StartDate -and $_.CreationTime -lt $EndDate} |
Select-Object FullName, CreationTime
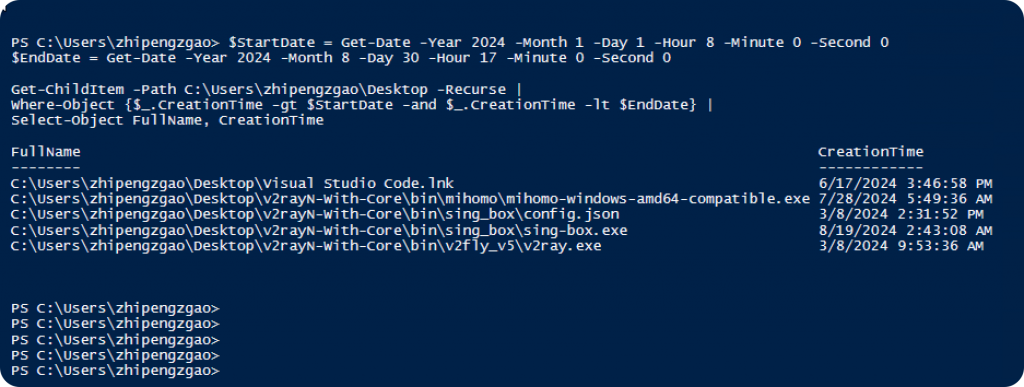
通过上面的脚本,我们可以获取在提供的日期和时间范围内创建的文件列表。
系统信息
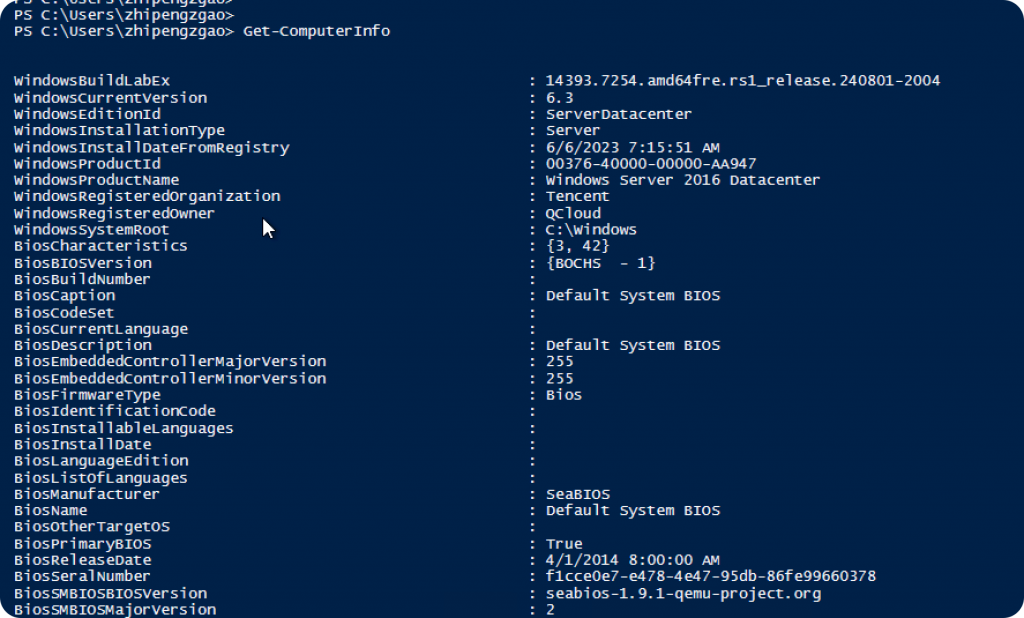
取证分析需要收集有关目标系统的详细信息。这可能包括操作系统版本、网络配置、正在运行的进程和服务、已安装的程序等。PowerShell 可用于收集大部分此类信息。例如,我们可以使用 Get-ComputerInfo cmdlet 来收集系统信息:
Get-ComputerInfo
Get-ComputerInfo cmdlet提供了有关系统的非常详细的信息,如下面的屏幕截图所示:
系统上次重启的时间是取证分析的重要信息。因为我们更有可能在攻击后未重启的系统中获取有关攻击者及其活动的调查结果。我们可以使用以下命令找出系统的上次重启时间:
[System.Management.ManagementDateTimeconverter]::ToDateTime((Get-WmiObject -Class Win32_OperatingSystem).LastBootUpTime)

运行应用程序和服务
PowerShell 提供了各种 cmdlet 来支持内存分析。例如,Get-Process cmdlet 返回有关所有正在运行的进程的信息。但是,更高级的内存分析将需要第三方工具。但至于要分析什么,我们可以使用 powershell 轻松获取正在运行的进程和服务列表。
Get-Process
Get-Service
此外,PowerShell 还可以与执行更复杂操作(如内存转储和分析)的工具集成。例如,可以使用 PowerShell 脚本操作 SysInternals 和 Windows 调试工具(如“procdump”和“WinDbg”)。
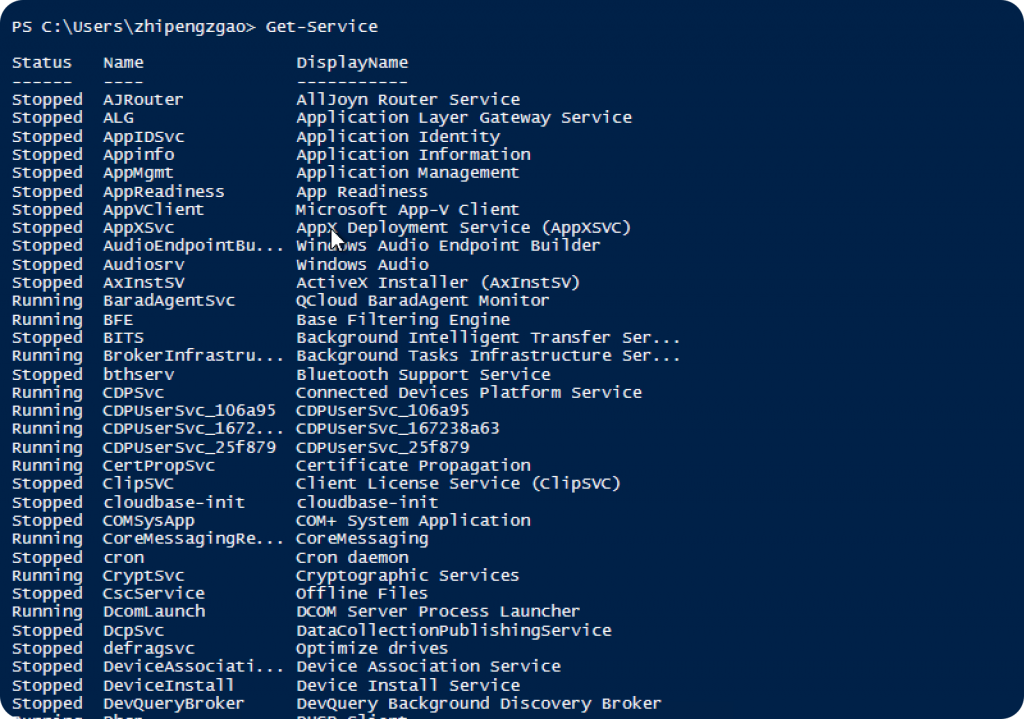
然而,内存分析通常需要更复杂的工具和技术。例如,Volatility 等内存分析工具可以对给定的内存转储文件执行各种分析。此类工具可以分析正在运行的进程、打开的文件、网络连接、已安装的驱动程序、服务、注册表信息和许多其他详细信息。然而,这些通常是通过 PowerShell 以外的单独工具来完成的。
用户审查
Invoke-Expression -Command 'query user'
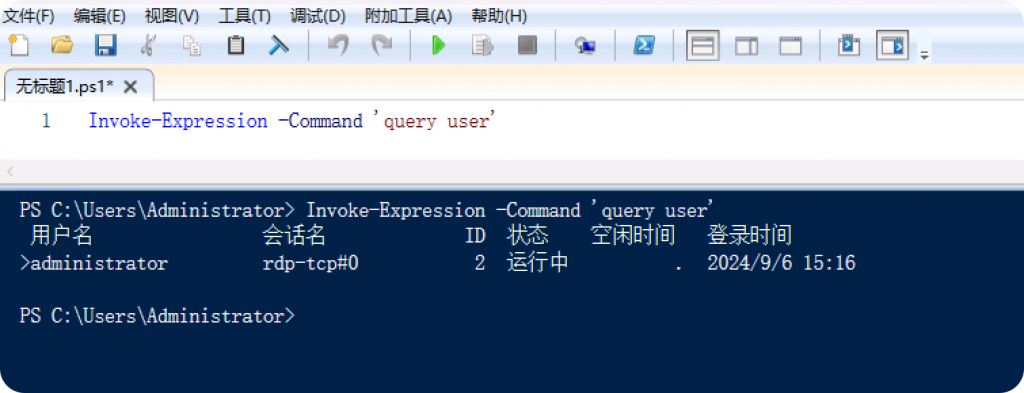
对于取证分析过程来说,用户如何登录至关重要。为了获取有关相关用户如何登录的信息,我们需要在 EventLogs 中找到该用户的最后一条日志记录,其 EventID 为 4624,并检查其中的登录类型值。
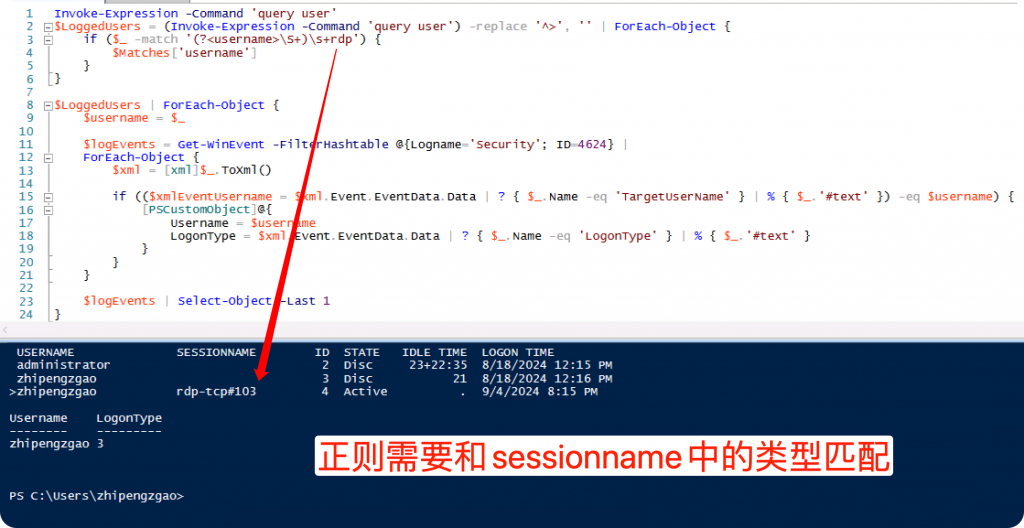
我们首先获取活跃用户列表。然后通过逐个获取此列表的 USERNAME 部分中的用户名,我们在 EventLogs 中找到这些用户名的最后 4624 个事件,最后从此记录中提取登录类型数据。
我们需要知道 Windows 的登录类型。例如,2 表示交互式(控制台)登录,3 表示网络登录,10 表示远程桌面登录。
LSASS 访问
在 Windows 系统上LSASS(本地安全机构子系统服务)内存转储通常与旨在从内存中提取凭据的恶意活动有关。通常是检查系统日志和正在运行的进程,以确定 LSASS 是否已转储内存。
在 Windows 中,当进行进程内存转储时,会引发事件 ID 为 1000(应用程序错误)的事件。因此第一步可能是控制此类事件。
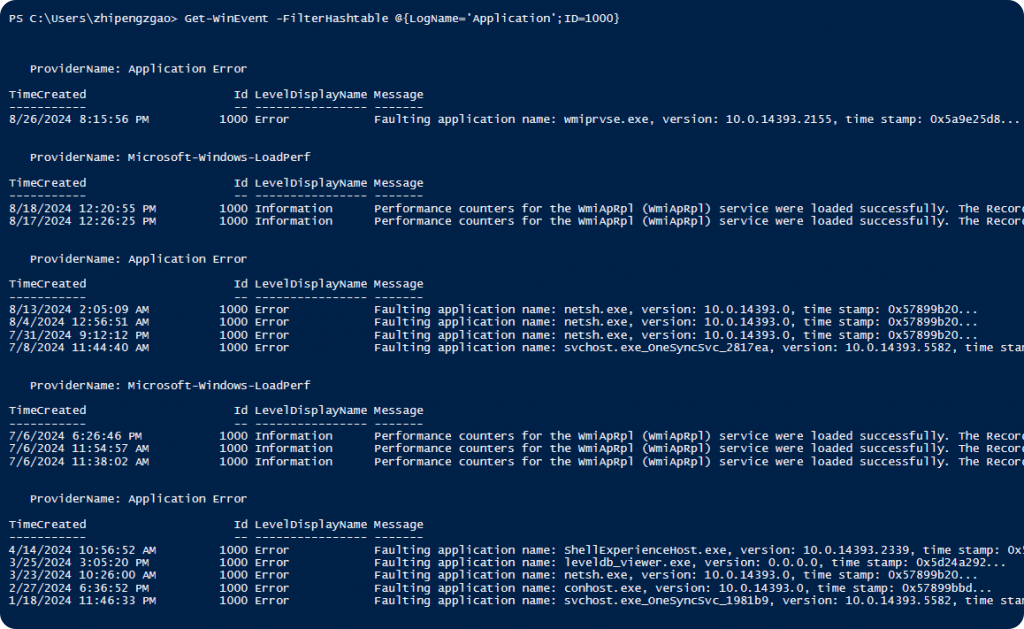
此输出可能具有较高的误报率,因为许多应用程序错误都使用此事件 ID 记录。可能需要进一步过滤结果。
WMI 活动
Windows 管理规范 (WMI) 通常用于检索系统信息、对进程和服务执行操作甚至运行代码。攻击者可能会滥用这些功能,这就是为什么在应急响应安全事件中,WMI 事件经常受到严格审查。
Windows 的 WMI 事件日志包含许多不同类型的事件,但通常最有趣的是通过 WMI 活动创建新进程时记录的事件,或者通过 WMI 活动停止或启动服务时记录的事件。
Get-WinEvent -FilterHashtable @{LogName='Microsoft-Windows-WMI-Activity/Operational'}
使用此命令将返回“Microsoft-Windows-WMI-Activity/Operational”日志。但是,此日志通常非常大并且包含大量信息,因此需要进一步过滤。例如,只能搜索具有特定 EventID 的事件或特定时间段内的事件。
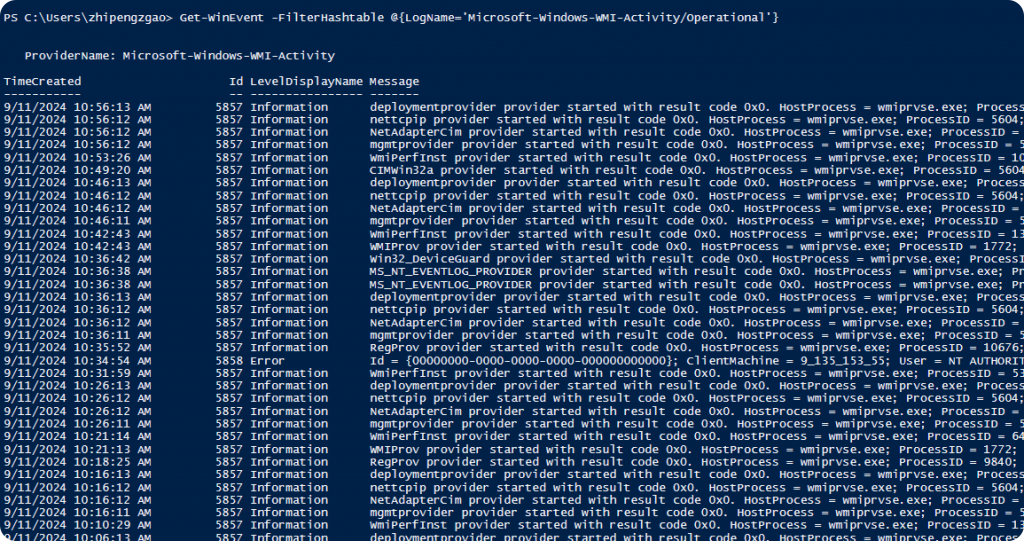
此外,通过 WMI 创建的进程通常使用 Win32_Process WMI 类的 Create 方法。这通常在创建事务时记录在事件日志中。要查找此类事件,可以使用命令过滤 WMI 事件日志中的事件并仅返回包含 Win32_Process和Create 的事件 。
最后,许多恶意 WMI 活动与特定进程(例如 PowerShell 或 cmd.exe)相关联。因此,查找涉及此类操作的 WMI 事件通常很有用。但是这种类型的搜索通常会返回大量误报,因为这些进程通常也用于合法活动。
查看 WMI 事件日志通常很有用。但是这种类型的分析通常必须与许多其他取证分析技术相结合。使用 PowerShell 扫描 WMI 事件时,我们可以关注一些最常见和最常被滥用的事件 ID。例如,5861 和 5859 通常在 WMI 活动类型启动和完成时触发。
以下 PowerShell 代码片段可用于检测可疑的 WMI 事件:
# Event IDs
$suspiciousEventIDs = 5861, 5859

#GetEvents
$events = Get-WinEvent -FilterHashtable @{LogName='Microsoft-Windows-WMI-Activity/Operational'; ID=$suspiciousEventIDs} -ErrorAction SilentlyContinue

#CreateLoop
foreach ($event in $events)
{
	# Set format to XML
	$xml = [xml]$event.ToXml()

		# If event found…
	if ($xml.Event.EventData.Data -contains 'Win32_Process' -or $xml.Event.EventData.Data -contains 'Create')
	{
		Write-Output ("Time: " + $event.TimeCreated)
		Write-Output ("Event ID: " + $event.Id)
		Write-Output ("Description: " + $event.Message)
		Write-Output ("--------------------------------------------- ----")
	}
}
此脚本从 Microsoft-Windows-WMI-Activity/Operational 日志中提取 具有特定事件 ID(此处为 5861 和 5859)的事件。在这些事件中,涉及 Win32_Process 或 Create 的事件 被视为潜在恶意事件并会显示出来。
应用分析
取证分析的另一个重要信息是系统中安装的应用程序及其详细信息。我们可以通过 Powershell 使用 WMI 访问这些内容。我们需要注意的是,由于安装方式的原因,某些应用程序可能不会出现在“已安装的应用程序”列表中。因此,通过查看注册表中的“卸载注册表”部分进行第二次检查非常重要:
Get-WmiObject -Query "Select * from Win32_Product" | Select-Object -Property Name,Vendor,Version
Get-ItemProperty HKLM:\Software\Microsoft\Windows\CurrentVersion\Uninstall\* | Select-Object DisplayName, DisplayVersion, Publisher, InstallDate
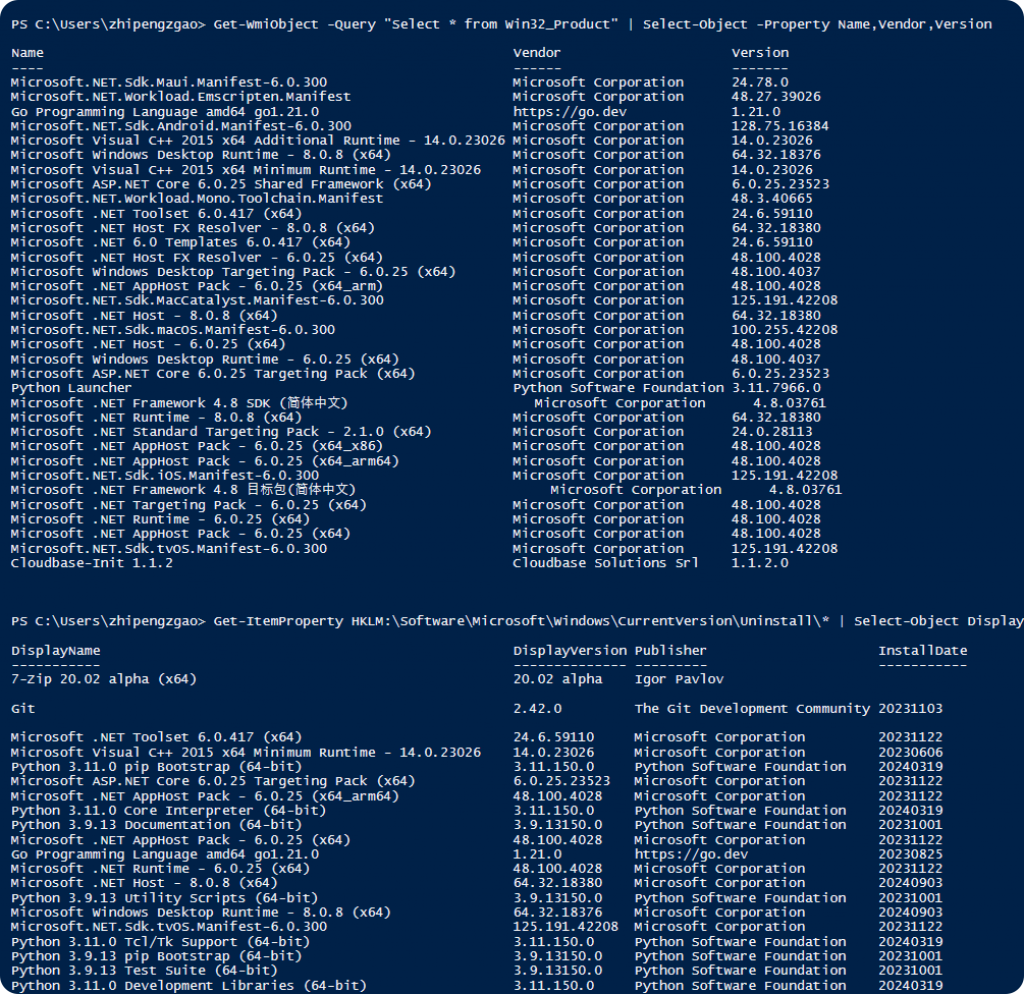
进行取证分析时的另一个重要问题是系统更新的状态。获取已安装更新的列表会很有帮助。
Get-HotFix | Format-Table -AutoSize
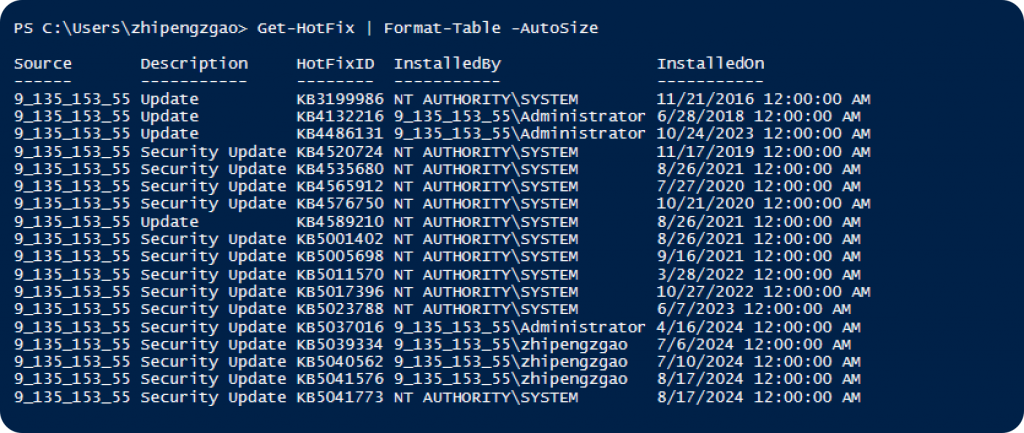
在取证分析中,未安装更新的列表与已安装的更新包一样重要。因为这个列表将为我们提供有关攻击者可能利用了哪些漏洞的非常有价值的信息。
使用 Powershell,我们可以检查系统上是否有任何未应用的更新并报告结果。
$updateSession = New-Object -ComObject Microsoft.Update.Session
$updateSearcher = $updateSession.CreateUpdateSearcher()

$updatesToDownload = New-Object -ComObject Microsoft.Update.UpdateColl

$searchResult = $updateSearcher.Search("IsInstalled=0 and Type='Software'")

if ($searchResult.Updates.Count -eq 0) {
	Write-Output "No updates to install."
} else {
	Write-Output "$($searchResult.Updates.Count) updates to install."

	$searchResult.Updates | ForEach-Object {
	Write-Output ("Title: " + $_.Title)
	Write-Output ("Description: " + $_.Description)
	Write-Output ("IsDownloaded: " + $_.IsDownloaded)
	Write-Output ("------------------")
	}
}
自动运行应用程序
在 Windows 操作系统中,有许多方法可以使某些应用程序在系统启动时自动运行,攻击者经常使用这些方法来获得系统中的持久性。
# Startup Items
Get-CimInstance -Class Win32_StartupCommand
# Startup Folder
Get-ChildItem -Path "$env:USERPROFILE\AppData\Roaming\Microsoft\Windows\Start Menu\Programs\Startup"
#Services
Get-Service | Where-Object {$_.StartType -eq 'Automatic'}
#Drivers
Get-WmiObject Win32_SystemDriver | Where-Object {$_.StartMode -eq 'Auto'}
# Registry
Get-ItemProperty -Path 'HKLM:\Software\Microsoft\Windows\CurrentVersion\Run'
Get-ItemProperty -Path 'HKLM:\Software\Microsoft\Windows\CurrentVersion\RunOnce'
Get-ItemProperty -Path 'HKCU:\Software\Microsoft\Windows\CurrentVersion\Run'
Get-ItemProperty -Path 'HKCU:\Software\Microsoft\Windows\CurrentVersion\RunOnce'

# Scheduled Tasks
Get-ScheduledTask | Where-Object {$_.Settings.StartWhenAvailable -eq $true -and $_.State -ne "Disabled"}
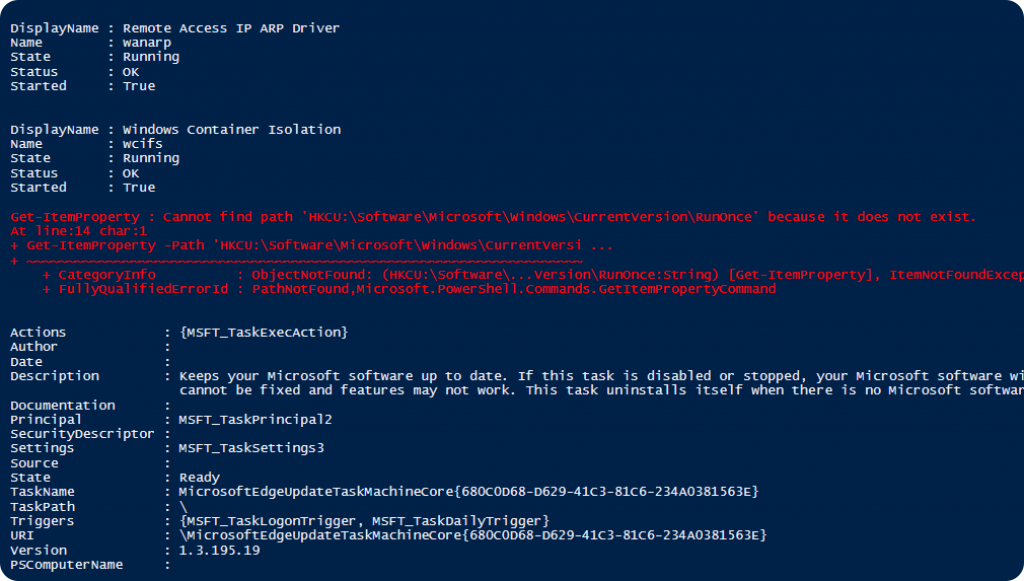
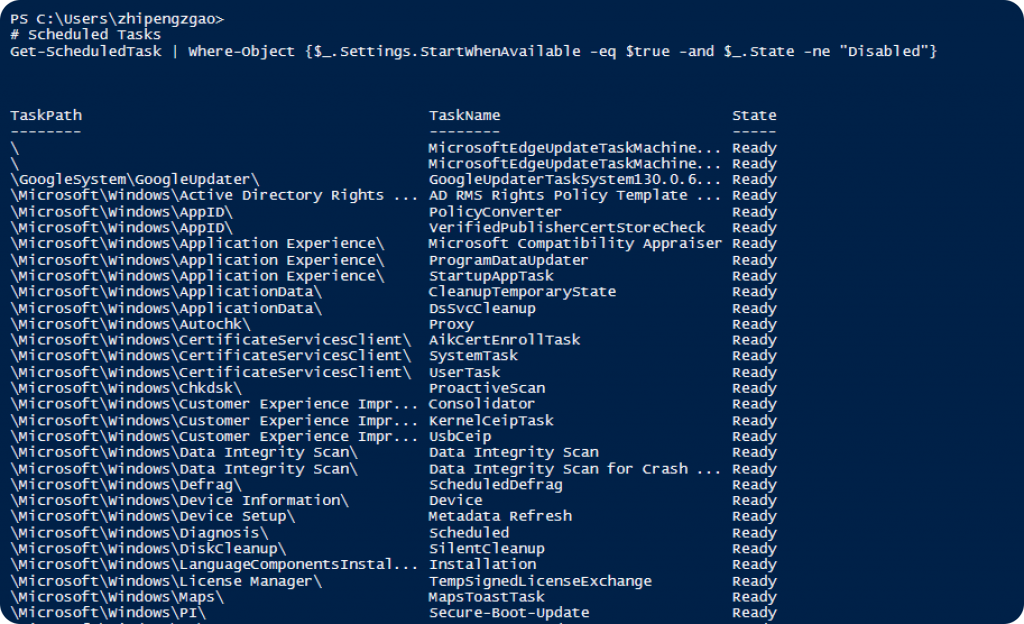
攻击者可以利用在 Windows 操作系统中获得持久性的区域不仅限于这些,而且不可能用 PowerShell 控制所有这些区域。但如果我们需要深入调查,则可能需要包括允许更详细分析的工具,例如 SysInternals 工具中的 Autoruns 工具。
脚本汇总
每个事件都有自己独特的结构,因此每个事件可能包含特定于该事件的不同输入和输出。我们可以将上面所做的操作和其他操作组合成如下所示的脚本,并在开始检查时快速创建存档,方便应急响应时直接使用。
# Analyze-System.ps1

# Download and Prepare procdump
# Note: EndPoint protection tools may consider procdump.exe as malicious.
# So you may need to define exception
Invoke-WebRequest -Uri "https://download.sysinternals.com/files/Procdump.zip" -OutFile ".\Procdump.zip"

Expand-Archive -Path ".\Procdump.zip" -DestinationPath ".\Procdump"


my money(
[DateTime]$StartTime = (Get-Date).AddDays(-1),
[DateTime]$EndTime = (Get-Date)
)

# Prepare export folder
$hostname = $env:COMPUTERNAME
$timestamp = Get-Date -Format "yyyyMMdd_HHmmss"
$outputPath = ".\$($hostname)_$($timestamp)_analyze"
New-Item -ItemType Directory -Force -Path $outputPath | Out-Null

# Function to export data to CSV
function ExportToCSV($data, $fileName) {
$data | Export-Csv -Path (Join-Path -Path $outputPath -ChildPath "$fileName.csv") -NoTypeInformation
}

# Get event logs
$eventLogs = Get-WinEvent -FilterHashTable @{LogName='Application'; StartTime=$StartTime; EndTime=$EndTime}
$eventLogs += Get-WinEvent -FilterHashTable @{LogName='System'; StartTime=$StartTime; EndTime=$EndTime}
$eventLogs += Get-WinEvent -FilterHashTable @{LogName='Security'; StartTime=$StartTime; EndTime=$EndTime}
ExportToCSV -data $eventLogs -fileName "EventLogs"

# Get LSASS memory dump
# Note: This requires procdump.exe to be available on the system, and the script to be run as administrator
& .\procdump\procdump.exe -ma lsass.exe lsass.dmp
Move-Item -Path .\lsass.dmp -Destination $outputPath

# Get active process hashes
# Note: This requires Sysinternals suite to be available on the system
$processes = Get-Process

# Start Foreach loop for process list
foreach ($process in $processes) {

    # Find current process path
$filePath = $process.MainModule.FileName
if ($filePath) {
	$hashes= {Get-FileHash $filePath}
}
}

ExportToCSV -data $hashes -fileName "ProcessHashes"


# Get DLL and EXE hashes
$files = Get-ChildItem -Path C:\Windows, C:\Windows\System32 -Include *.dll, *.exe -Recurse -ErrorAction SilentlyContinue
$hashes = $files | ForEach-Object {Get-FileHash $_.FullName}
ExportToCSV -data $hashes -fileName "FileHashes"

# Get directory metadata
$directories = Get-ChildItem -Path C:\Windows, C:\Windows\System32 -Recurse -Directory -ErrorAction SilentlyContinue
ExportToCSV -data $directories -fileName "DirectoryMetadata"

# Get listening ports and applications
$ports = Get-NetTCPConnection | Where-Object {$_.State -eq 'Listen'}
ExportToCSV -data $ports -fileName "ListeningPorts"

# Get logged in users and login types
# Note: This requires the 'logon' module to be available on the system
$loggedInUsers = Get-LoggedOnUser | Where-Object {($_.LogonTime -ge $StartTime) -and ($_.LogonTime -le $EndTime)}
ExportToCSV -data $loggedInUsers -fileName "LoggedInUsers"

# Get installed applications
$installedApps = Get-ItemProperty HKLM:\Software\Wow6432Node\Microsoft\Windows\CurrentVersion\Uninstall\*
ExportToCSV -data $installedApps -fileName "InstalledApps"

# Get installed updates
$installedUpdates = Get-Hotfix
ExportToCSV -data $installedUpdates -fileName "InstalledUpdates"

# Get pending updates
# Note: This requires the 'PSWindowsUpdate' module to be available on the system
$pendingUpdates = Get-WUList
ExportToCSV -data $pendingUpdates -fileName "PendingUpdates"

# Get auto-start applications
$autoStartApps = Get-CimInstance -Class Win32_StartupCommand
ExportToCSV -data $autoStartApps -fileName "AutoStartApps"

# Get computer info
$computerInfo = Get-ComputerInfo
ExportToCSV -data $computerInfo -fileName "ComputerInfo"

# Compress output folder
Compress-Archive -Path $outputPath -DestinationPath "$outputPath.zip"

# Delete output folder
Remove-Item -Path $outputPath -Recurse -Force
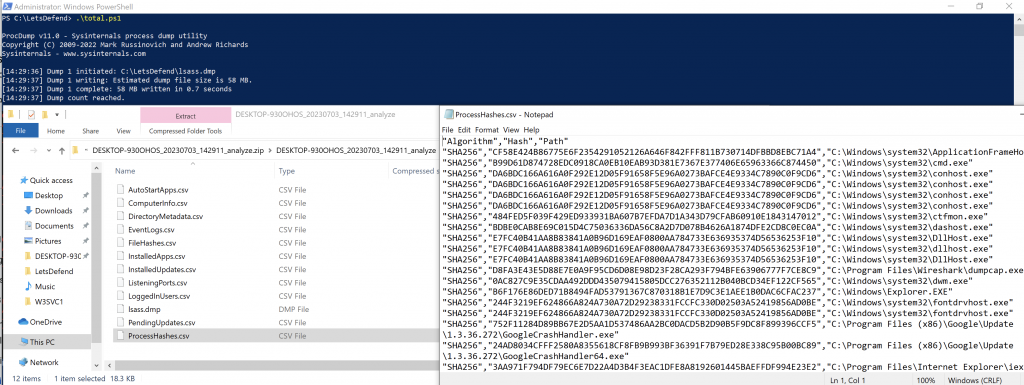
当我们的脚本运行时,它首先创建一个目录,其中包含运行它的系统的名称以及日期和时间信息,将收集的信息以文件的形式保存在此目录中,并以 zip 格式压缩文件夹,并在完成后将其删除。可以将生成的 zip 文件移动到想要的任何环境并在那里继续分析。
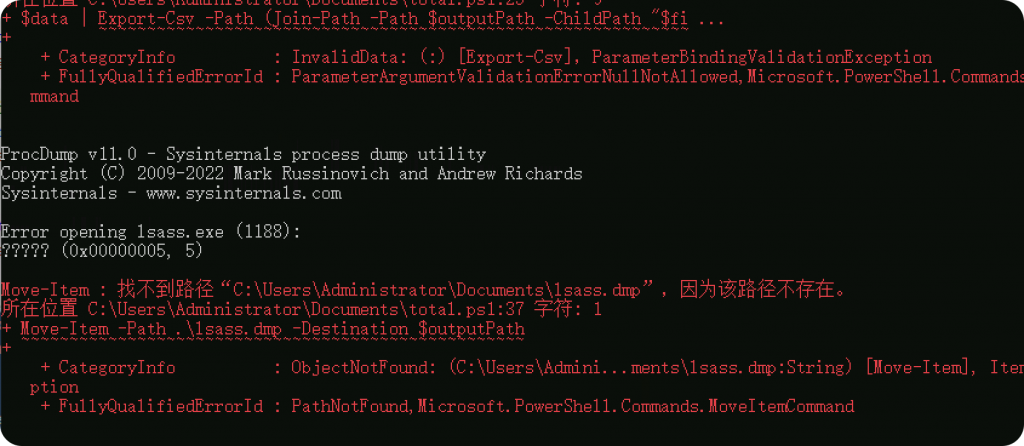
注意在实际场景下dump lassas内存的操作是会被拦截的,所以需要根据实际情况调整。
赞赏 微信赞赏
微信赞赏 支付宝赞赏
支付宝赞赏
发表评论