Git/SVN 应急响应排查实战手册
随着最近几年AI普及之后,供应链的攻击层出不穷,代码仓库被投毒的案例更是屡见不鲜。但是目前针对git/svn 还没有系统性的排查方案,所以这一块的应急排查内容还是空白。本文是我经历过多次代码投毒的真实案例后,写的实战排查手册。
为什么要关注版本控制系统安全
过去几年,供应链攻击已经从”理论威胁”变成了”每季度都在发生的事”。攻击者不再只盯着运行中的服务器,而是把手伸向了更上游的地方——代码仓库。一次成功的代码投毒,影响面可以是数百万台机器。这篇文章不讲理论框架,只讲拿到一个可能被污染的仓库后,怎么一步步把事情查清楚。所有命令都是我在实际应急中用过的,拿来就能跑。
代码仓库投毒真实案例
在讲排查方法之前,先看看这些年都出过什么事。了解攻击者的手法,才能知道排查时该重点看什么。
xz-utils 后门 (CVE-2024-3094)
时间线: 2021年11月 ~ 2024年3月
这个案例之所以震惊整个安全圈,是因为攻击者花了两年半来布局。
攻击者 “Jia Tan” 从 2021 年开始以正常贡献者身份参与 xz-utils 项目,提交了大量合法代码。与此同时,多个马甲账号(Jigar Kumar、Dennis Ens 等)在邮件列表上不断给原始维护者 Lasse Collin 施压,抱怨项目维护速度慢,要求增加新的 co-maintainer。Lasse Collin 最终将维护权交给了 Jia Tan。拿到权限后,Jia Tan 在测试用的二进制文件中藏入了后门代码。
关键点:这些恶意代码只出现在发布的 tarball 中,不在 GitHub 仓库里。这意味着看 GitHub 上的源码根本发现不了。后门劫持了 OpenSSH 的 RSA_public_decrypt 函数,持有特定 Ed448 私钥的攻击者可以在任何受影响的机器上执行任意命令。
发现方式: 微软工程师 Andres Freund 在调试 Debian 预发布系统时注意到 SSH 登录变慢了 500ms,顺藤摸瓜查到了 liblzma。
PHP git.php.net 入侵
时间线: 2021年3月28日
攻击者利用 master.php.net 泄露的凭据,通过 HTTPS + 密码认证直接向 php-src 仓库推送了两个恶意 commit,伪装成 Rasmus Lerdorf(PHP 之父)和 Nikita Popov 的提交。
commit message 写的是 “Fix typo”,实际植入了一个 User-Agent 触发的后门——当 HTTP 请求的 User-Agent 以 zerodium 开头时,执行任意 PHP 代码。
发现方式: 安全研究人员在代码审查中发现了异常逻辑。
Axios npm 供应链攻击
时间线: 2026年3月
朝鲜关联的攻击者通过社会工程和 RAT 木马获取了 Axios(周下载量 1 亿+)维护者的 npm 账号,绕过 GitHub Actions OIDC 发布机制,直接用长期有效的 npm token 通过 CLI 发布了含跨平台 RAT 的恶意版本。从发布到下架只有 3 小时,但很短的时间内也有大量的开发者中招。
Git 应急排查完整命令
以下是拿到一个可疑 Git 仓库后的系统排查流程,这里用xz-utils 后门事件当时的仓库源码进行演示。
保留现场
在做任何操作之前,先把证据固定下来:
# 完整克隆仓库(包含所有分支、tag、reflog)
git clone --mirror <repo_url> evidence_repo.git

# 如果是本地仓库,直接打包
tar czf evidence_$(date +%Y%m%d_%H%M%S).tar.gz .git/

# 记录当前状态
git log --all --oneline > /tmp/evidence_log.txt
git reflog --all > /tmp/evidence_reflog.txt
git branch -a > /tmp/evidence_branches.txt
梳理提交时间线
按时间范围过滤提交
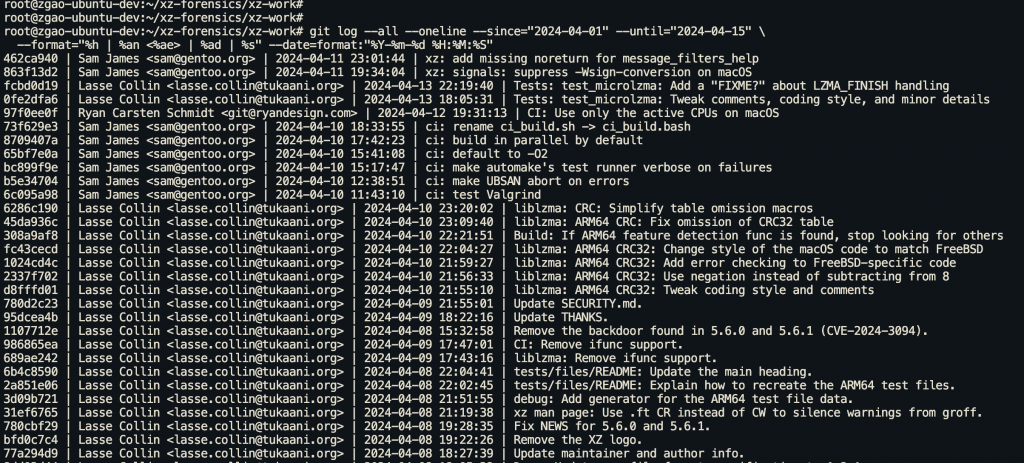
# 查看事件窗口内的所有提交
git log --all --oneline --since="2024-04-01" --until="2024-04-15" \
  --format="%h | %an <%ae> | %ad | %s" --date=format:"%Y-%m-%d %H:%M:%S"

# 按时间排序,看凌晨是否有异常提交
git log --all --format="%ad | %an | %h | %s" --date=format:"%H:%M" \
  --since="2024-04-01" | sort
按作者过滤
# 列出所有提交者及其提交数
git shortlog -s -n -e --all

# 查看特定作者的所有提交
git log --all --author="suspicious_user" --format="%H %ad %s" --date=short

# 对比 author 和 committer 是否一致(不一致值得关注,但不等于伪造)
# 注意:$2 和 $3 不能带 "Author:"/"Committer:" 前缀,否则永远不相等

git log --all --format="%H|%an <%ae>|%cn <%ce>|%s" \
  | awk -F'|' '$2 != $3'

# 常见的"正常不一致"场景(不是攻击):
#   - PR 合并:外部贡献者 Author,维护者 Committer
#   - git cherry-pick / rebase:重放时 Committer 变成操作者
#   - GitHub Web UI 的 "Merge" / "Squash and merge"
#   - 补丁邮件工作流(git am)
# 真正可疑的是:Author 和 Committer 本该是同一个"信任"身份但不一致
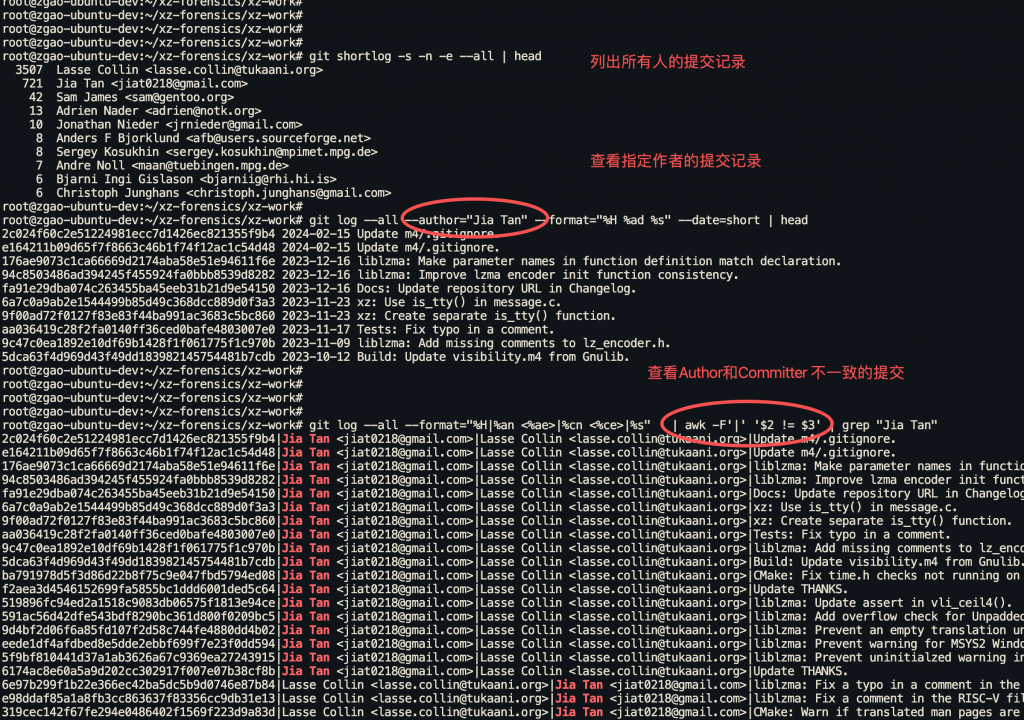
重要: Git 的 author 和 committer 字段都可以通过 GIT_AUTHOR_NAME、GIT_COMMITTER_EMAIL 等环境变量伪造。PHP 后门事件中攻击者就是这样伪装成 Rasmus Lerdorf 的。不能仅凭这些字段判断身份。
按文件路径过滤
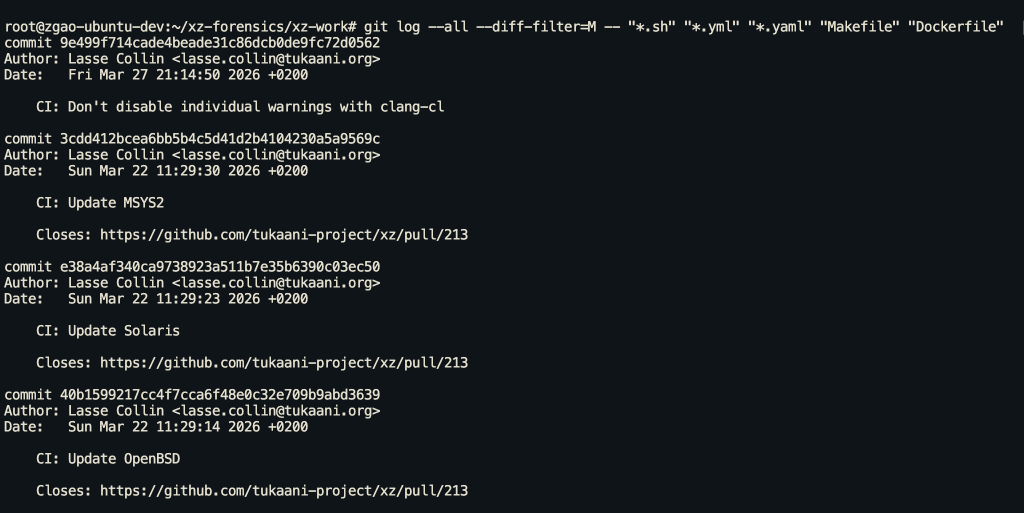
# 查看特定敏感文件的修改历史
git log --all --follow -- Makefile
git log --all --follow -- .github/workflows/
git log --all --follow -- scripts/
git log --all --follow -- Dockerfile

# 查看哪些 commit 修改了构建相关文件
git log --all --diff-filter=M -- "*.sh" "*.yml" "*.yaml" "Makefile" "Dockerfile"
搜索提交内容
# 搜索引入了特定字符串的 commit(-S pickaxe 搜索)
git log --all -p -S "eval("
git log --all -p -S "exec("
git log --all -p -S "curl "
git log --all -p -S "wget "
git log --all -p -S "base64"
git log --all -p -S "/dev/tcp/"
git log --all -p -S "zerodium"  # PHP 后门案例中的关键字

# 正则搜索(-G 选项)
git log --all -p -G "password\s*=\s*['\"]"
git log --all -p -G "(api[_-]?key|secret|token)\s*[:=]"

# 搜索 commit message 中的可疑关键字
# 注意:多个 --grep 默认是 OR 关系;--grep 会匹配 message 全文(含 body),
# 想精确只匹配 subject 的话,用 --format="%s" 后再 grep。
git log --all --grep="typo\|fix typo\|minor" --oneline  # "Fix typo" 是常见伪装
git log --all --format="%h %s" | grep -iE "^[a-f0-9]+ (fix typo|minor|cleanup|update)$" | head -20

# 要求同时匹配多个关键字(AND),加 --all-match
git log --all --all-match --grep="build" --grep="ignore" --oneline

分析具体 commit
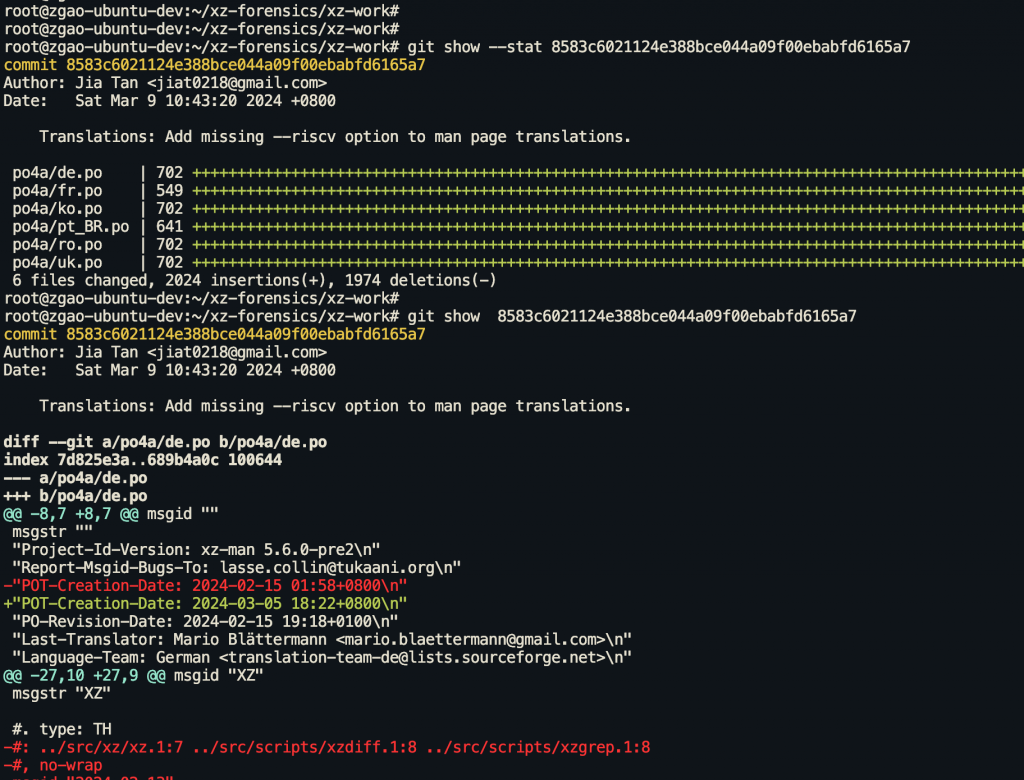
# 查看某个 commit 的完整变更
git show <commit_hash>

# 查看 commit 修改了哪些文件(不看内容)
git show --stat <commit_hash>

# 对比两个 commit 之间的差异
git diff <commit1>..<commit2>

# 查看某个文件在特定 commit 时的完整内容
git show <commit_hash>:path/to/file

# 大上下文 diff(看更多周围代码)
git diff -U20 <commit1>..<commit2> -- path/to/file
追溯代码归属
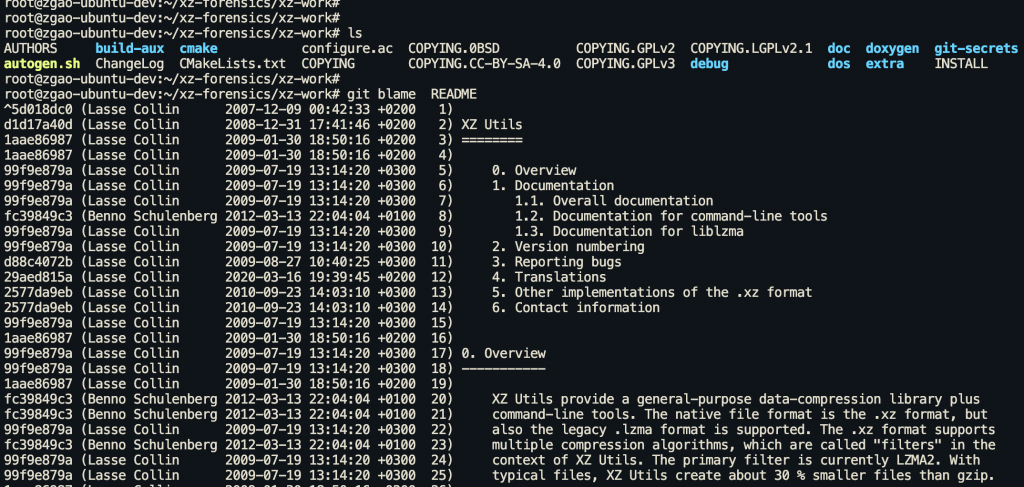
# 逐行追溯文件的修改者
git blame path/to/suspicious_file

# 指定行范围
git blame -L 100,120 path/to/suspicious_file

# 显示更详细的信息(包括日期)
git blame --date=short -L 100,120 path/to/suspicious_file

# 追踪代码移动(跨文件追踪)
git blame -C -C path/to/file
恢复被删除/隐藏的历史
这是应急排查中最关键的部分之一。攻击者可能会通过 force push 或 rebase 来删除恶意 commit 的痕迹。
Reflog 分析
# 查看所有引用的变更历史
git reflog --all

# 先查当前默认分支名(老项目通常是 master,新项目是 main)
DEFAULT_BRANCH=$(git symbolic-ref refs/remotes/origin/HEAD 2>/dev/null | sed 's@^refs/remotes/origin/@@')
echo "当前默认分支: $DEFAULT_BRANCH"

# 查看特定分支的 reflog(用上面查出来的真实分支名)
git reflog show "$DEFAULT_BRANCH"
git reflog show "origin/$DEFAULT_BRANCH"

# 格式化输出,便于分析
git reflog --all --format="%gd | %gs | %H | %ci"

# 查找 force push 的痕迹
git reflog --all | grep -i "forced\|reset\|rebase"
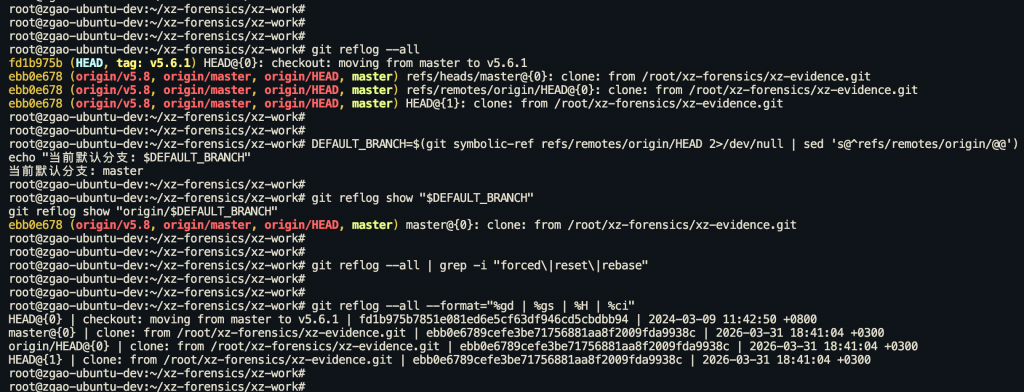
注意: git reflog 是本地数据,默认保留 90 天。如果是远程仓库,需要在服务器端查看。GitHub/GitLab 的 audit log 可以补充这部分信息。
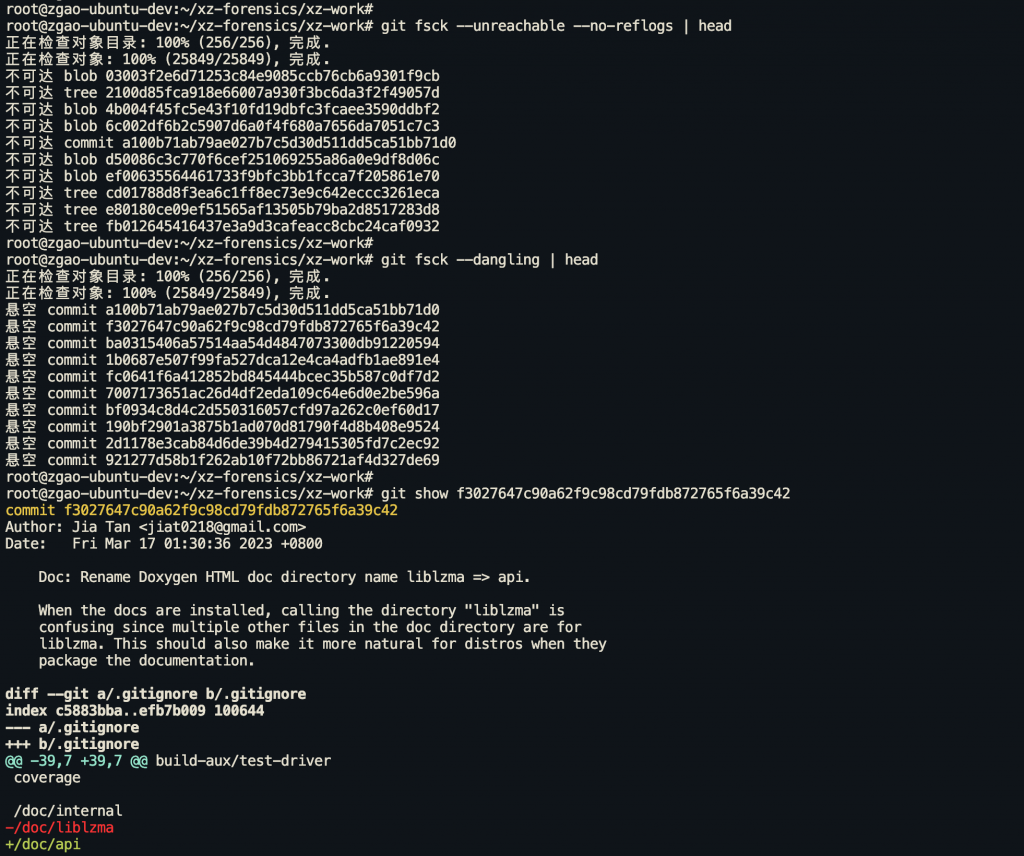
查找悬空对象
# 查找所有不可达的 commit
git fsck --unreachable --no-reflogs

# 查找悬空 commit(没有任何引用指向的)
git fsck --dangling

# 查找丢失的对象并恢复到 .git/lost-found/
git fsck --lost-found

# 查看悬空 commit 的内容
git show <dangling_commit_hash>

# 如果发现可疑的悬空 commit,创建临时分支保存
git branch evidence_recovered <dangling_commit_hash>
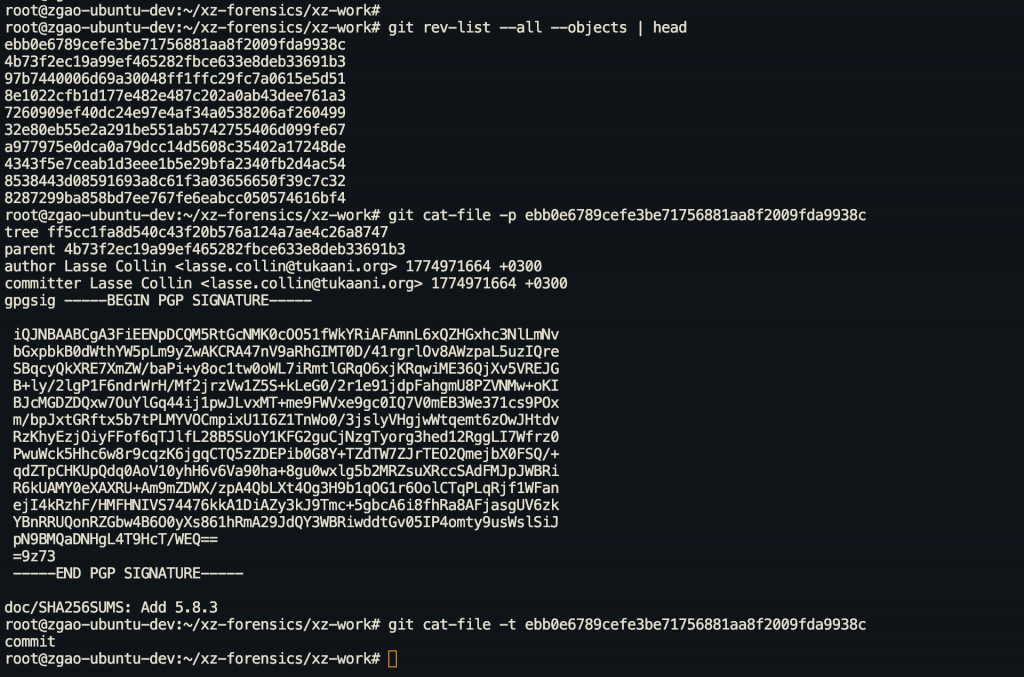
直接检查 Git 对象
# 查看对象类型
git cat-file -t <object_hash>

# 查看对象内容
git cat-file -p <object_hash>

# 列出所有对象
git rev-list --all --objects

# 查看 tree 对象(目录结构)
git ls-tree -r <tree_hash>
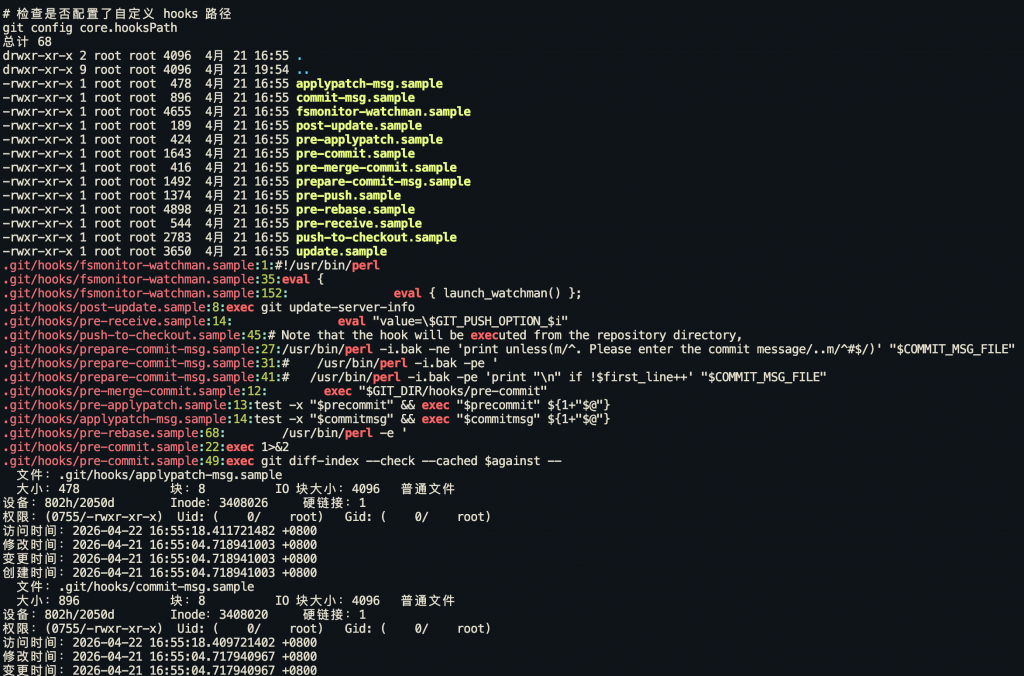
检查 Git Hooks(持久化后门)
Git hooks 是攻击者植入持久化后门的常见位置。每次 git pull、git commit、git checkout 都可能触发恶意代码执行。
# 列出所有 hook 文件
ls -la .git/hooks/

# 检查是否有可执行的非 .sample 文件
find .git/hooks/ -type f ! -name "*.sample" -exec ls -la {} \;

# 查看所有 hook 的内容
for hook in .git/hooks/*; do
  if [ -f "$hook" ] && [ -x "$hook" ] && [[ ! "$hook" == *.sample ]]; then
    echo "=== $hook ==="
    cat "$hook"
    echo ""
  fi
done

# 搜索可疑命令
grep -rn "curl\|wget\|nc \|ncat\|bash -i\|/dev/tcp\|eval\|exec\|python\|perl\|ruby" \
  .git/hooks/

# 检查文件修改时间
stat .git/hooks/*

# 检查是否配置了自定义 hooks 路径
git config core.hooksPath
重点关注的 hook 文件:
| Hook | 触发时机 | 风险 |
|---|---|---|
pre-commit | 每次 commit 前 | 可在开发者机器上执行任意命令 |
post-checkout | 每次 checkout/pull 后 | 切换分支即触发 |
post-merge | 每次 merge/pull 后 | 拉取代码即触发 |
pre-push | 每次 push 前 | 可窃取凭据 |
post-receive | 服务端收到 push 后 | 服务器端 RCE |
检查 Git 配置
# 查看仓库级别的配置
git config -l --local

# 直接查看配置文件
cat .git/config

# 检查可疑的配置项
git config core.fsmonitor      # 可以指向恶意脚本
git config core.sshCommand     # 可以替换 SSH 命令
git config core.pager          # 可以替换 pager
git config core.editor         # 可以替换编辑器
git config core.hooksPath      # 自定义 hooks 路径
git config credential.helper   # 凭据助手,可能是窃取器

# 检查所有 alias(可能藏有恶意命令)
git config -l | grep "^alias\."

# 检查 filter 配置(clean/smudge filter 可以执行任意命令)
git config -l | grep "filter\."

# 检查远程仓库地址是否被篡改
git remote -v

重点: core.fsmonitor 和 filter.*.process 配置项可以在 git status、git add 等日常操作中执行任意命令,是非常隐蔽的攻击向量。CVE-2024-32002 就利用了类似机制。
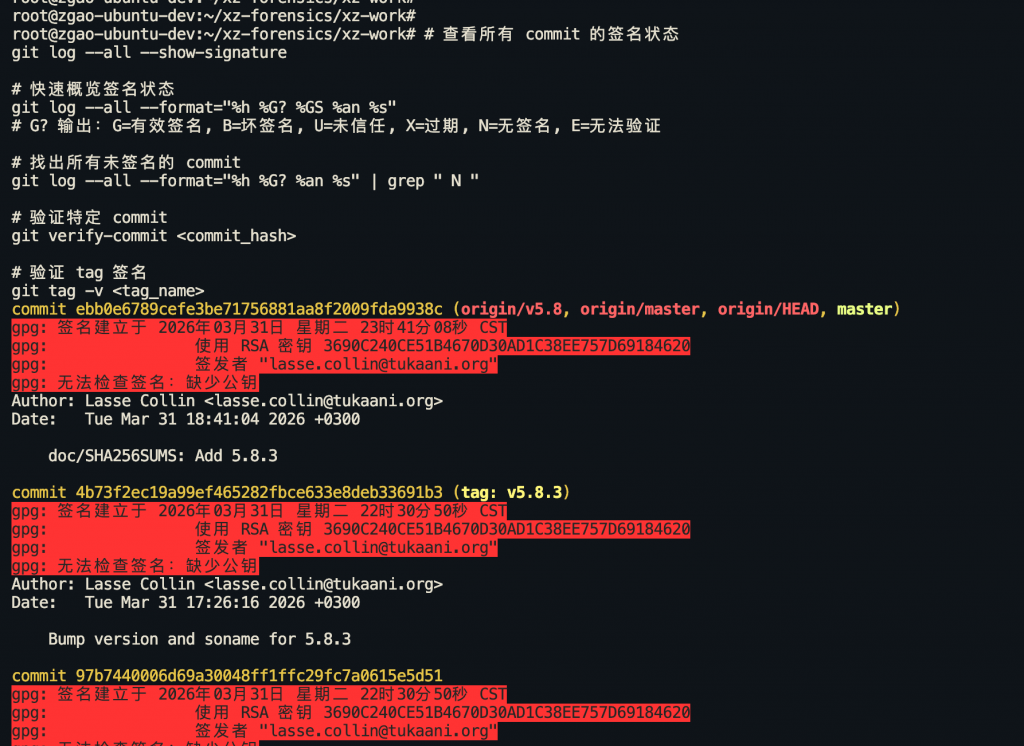
验证提交签名
# 查看所有 commit 的签名状态
git log --all --show-signature

# 快速概览签名状态
git log --all --format="%h %G? %GS %an %s"
# G? 输出:G=有效签名, B=坏签名, U=未信任, X=过期, N=无签名, E=无法验证

# 找出所有未签名的 commit
git log --all --format="%h %G? %an %s" | grep " N "

# 验证特定 commit
git verify-commit <commit_hash>

# 验证 tag 签名
git tag -v <tag_name>
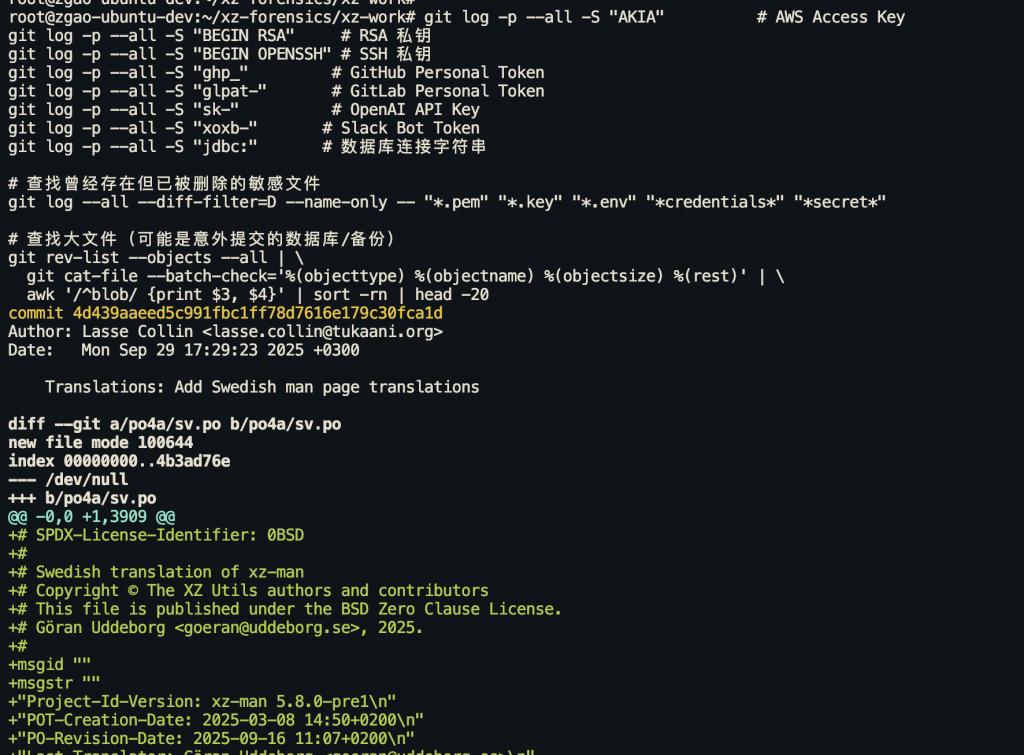
检查敏感信息泄露
# 在整个历史中搜索密码/密钥
git log -p --all -S "AKIA"          # AWS Access Key
git log -p --all -S "BEGIN RSA"     # RSA 私钥
git log -p --all -S "BEGIN OPENSSH" # SSH 私钥
git log -p --all -S "ghp_"         # GitHub Personal Token
git log -p --all -S "glpat-"       # GitLab Personal Token
git log -p --all -S "sk-"          # OpenAI API Key
git log -p --all -S "xoxb-"       # Slack Bot Token
git log -p --all -S "jdbc:"       # 数据库连接字符串

# 查找曾经存在但已被删除的敏感文件
git log --all --diff-filter=D --name-only -- "*.pem" "*.key" "*.env" "*credentials*" "*secret*"

# 查找大文件(可能是意外提交的数据库/备份)
git rev-list --objects --all | \
  git cat-file --batch-check='%(objecttype) %(objectname) %(objectsize) %(rest)' | \
  awk '/^blob/ {print $3, $4}' | sort -rn | head -20
平台审计日志
GitHub
# 组织级审计日志
curl -s -H "Authorization: Bearer $GITHUB_TOKEN" \
  "https://api.github.com/orgs/<org>/audit-log?phrase=action:push" | jq

# 仓库事件
curl -s -H "Authorization: Bearer $GITHUB_TOKEN" \
  "https://api.github.com/repos/<owner>/<repo>/events" | jq

# 查看 deploy key 列表
curl -s -H "Authorization: Bearer $GITHUB_TOKEN" \
  "https://api.github.com/repos/<owner>/<repo>/keys" | jq

# 查看 webhooks(可能被添加恶意 webhook)
curl -s -H "Authorization: Bearer $GITHUB_TOKEN" \
  "https://api.github.com/repos/<owner>/<repo>/hooks" | jq
GitLab
# 项目审计事件
curl -s --header "PRIVATE-TOKEN: $GITLAB_TOKEN" \
  "http://gitlab.example.com/api/v4/projects/<id>/audit_events" | jq

# 按时间过滤
curl -s --header "PRIVATE-TOKEN: $GITLAB_TOKEN" \
  "http://gitlab.example.com/api/v4/projects/<id>/audit_events?created_after=2024-04-01" | jq

# 查看 deploy tokens
curl -s --header "PRIVATE-TOKEN: $GITLAB_TOKEN" \
  "http://gitlab.example.com/api/v4/projects/<id>/deploy_tokens" | jq

# 查看项目访问 tokens
curl -s --header "PRIVATE-TOKEN: $GITLAB_TOKEN" \
  "http://gitlab.example.com/api/v4/projects/<id>/access_tokens" | jq
SVN 应急排查
虽然 Git 已经是主流,但很多企业内部(特别是传统行业、游戏公司)仍在使用 SVN。SVN 的排查思路类似,但命令不同。
客户端排查
# 查看修改日志(带文件变更列表)
svn log -v
svn log -v -l 100  # 最近 100 条

# 按时间范围过滤
svn log -r {2024-04-01}:{2024-04-15} -v

# 按作者搜索
svn log --search "username" -v

# 查看特定版本的变更内容
svn diff -c 1234                    # 第 1234 版本的变更
svn diff -r 1233:1234 path/to/file  # 对比两个版本

# 逐行追溯
svn blame path/to/file
svn annotate path/to/file  # 同上,更详细

# 查看文件在特定版本时的内容
svn cat -r 1234 path/to/file

# 检查 SVN 属性(可能被植入 svn:externals 拉取外部恶意代码)
svn proplist -v path/to/directory
svn propget svn:externals path/to/directory

# 查看仓库信息
svn info
重点: svn:externals 属性可以引入外部仓库的代码,攻击者可能利用这个特性引入恶意依赖。这相当于 Git submodule 的攻击面。
服务端排查
# 查看最新版本号
svnlook youngest /path/to/repo

# 查看特定版本的提交信息
svnlook info /path/to/repo -r 1234

# 查看特定版本的变更文件列表
svnlook changed /path/to/repo -r 1234

# 查看特定版本的 diff
svnlook diff /path/to/repo -r 1234

# 查看特定版本中某个文件的内容
svnlook cat /path/to/repo path/to/file -r 1234

# 查看目录树
svnlook tree /path/to/repo -r 1234

# 检查 hooks
ls -la /path/to/repo/hooks/
cat /path/to/repo/hooks/pre-commit
cat /path/to/repo/hooks/post-commit
grep -rn "curl\|wget\|eval\|exec\|python\|perl" /path/to/repo/hooks/

# 检查权限配置
cat /path/to/repo/conf/authz
cat /path/to/repo/conf/svnserve.conf

# 检查用户认证文件
cat /path/to/repo/conf/passwd

# 检查 Apache 配置(如果用 mod_dav_svn)
cat /etc/httpd/conf.d/subversion.conf  # CentOS/RHEL
cat /etc/apache2/mods-available/dav_svn.conf  # Debian/Ubuntu
SVN 批量日志分析脚本
#!/bin/bash
# SVN 应急排查脚本
REPO_URL="$1"
START_DATE="${2:-2024-04-01}"
END_DATE="${3:-2024-04-15}"

echo "[*] SVN 应急排查开始"
echo "[*] 仓库: $REPO_URL"
echo "[*] 时间范围: $START_DATE ~ $END_DATE"

echo ""
echo "=== 时间窗口内的所有提交 ==="
svn log "$REPO_URL" -r "{$START_DATE}:{$END_DATE}" -v

echo ""
echo "=== 提交者统计 ==="
svn log "$REPO_URL" -r "{$START_DATE}:{$END_DATE}" | \
  grep "^r[0-9]" | awk '{print $3}' | sort | uniq -c | sort -rn

echo ""
echo "=== 敏感文件变更 ==="
svn log "$REPO_URL" -r "{$START_DATE}:{$END_DATE}" -v | \
  grep -iE "\.(sh|py|rb|pl|bat|cmd|ps1|yml|yaml|conf|cfg|env|key|pem)$"

echo ""
echo "=== SVN externals 检查 ==="
svn propget svn:externals -R "$REPO_URL" 2>/dev/null
自动化扫描工具
手工排查之外,这些工具可以帮你快速过一遍整个仓库历史。
TruffleHog 凭据泄露扫描
坑: pip install trufflehog 装到的是 2020 年就停维的 Python v2 版本,命令语法完全不同。一定要装 Go 版的 v3+,下面示例都是 v3 语法。
# 正确安装 v3+(任选一种)
# macOS
brew install trufflesecurity/trufflehog/trufflehog

# Linux 一键安装 binary
curl -sSfL https://raw.githubusercontent.com/trufflesecurity/trufflehog/main/scripts/install.sh \
  | sh -s -- -b /usr/local/bin

# 或用 Docker
docker run --rm -v "$PWD:/pwd" trufflesecurity/trufflehog:latest \
  git file:///pwd --only-verified

# 确认版本 >= 3.x
trufflehog --version

# 扫描本地仓库(只显示已验证的泄露)
trufflehog git file:///path/to/repo --only-verified

# 扫描远程仓库
trufflehog git https://github.com/user/repo.git

# JSON 输出,便于后续分析
trufflehog git file:///path/to/repo --json > trufflehog_results.json

# 扫描文件系统(不依赖 git 历史)
trufflehog filesystem /path/to/directory --only-verified
Gitleaks 密钥/凭据检测
# 安装
# macOS: brew install gitleaks
# Linux: 下载 release binary

# 扫描当前仓库的完整历史
gitleaks detect -v --redact

# 扫描所有分支
gitleaks detect -v --log-opts="--all"

# 生成 JSON 报告
gitleaks detect -r gitleaks_report.json --report-format json

# 扫描指定 commit 范围
gitleaks detect --log-opts="<commit1>..<commit2>" -v

# 配合 pre-commit 使用(预防)
gitleaks protect --verbose
git-secrets (AWS 官方工具)
# 安装
git clone https://github.com/awslabs/git-secrets.git
cd git-secrets && make install

# 初始化(为当前仓库安装 hooks)
git secrets --install

# 注册 AWS 凭据检测规则
git secrets --register-aws

# 扫描整个历史
git secrets --scan

# 添加自定义规则
git secrets --add 'private_key'
git secrets --add 'jdbc:mysql://.*password='
detect-secrets (Yelp)
pip install detect-secrets

# 生成 baseline
detect-secrets scan > .secrets.baseline

# 审计结果
detect-secrets audit .secrets.baseline

# 扫描特定文件
detect-secrets scan path/to/file --all-files
应急响应 SOP
把上面的排查步骤串起来,形成一个标准操作流程:
遏制
1. 限制仓库访问权限(只读或完全锁定)
2. 撤销可疑账号的所有访问权限
3. 吊销可能泄露的 token/密钥/凭据
4. 完整克隆仓库作为证据保全(git clone --mirror)
5. 通知相关团队(开发、安全、运维)
排查
1. 确定时间窗口(从什么时候开始异常)
2. 运行自动化工具(TruffleHog / Gitleaks)做全量扫描
3. 按时间线梳理所有 commit
4. 重点检查:
   - 构建/部署相关文件的变更 (CI/CD, Makefile, Dockerfile, scripts/)
   - 依赖文件的变更 (package.json, requirements.txt, go.mod)
   - Git hooks 和配置
   - 新增的二进制文件或测试数据
   - Author/Committer 不一致的提交
   - 未签名的提交(如果项目要求签名)
5. 检查 reflog 和悬空对象,寻找被删除的证据
6. 查看平台审计日志(GitHub/GitLab/Gitea)
7. 检查 CI/CD pipeline 日志
8. 检查 webhook 配置是否被篡改
影响评估
1. 确定哪些代码被修改、修改了什么
2. 确定受影响的版本/发布
3. 确定是否有凭据泄露,列出所有需要轮换的凭据
4. 确定恶意代码是否已经进入生产环境
5. 确定下游影响(依赖此仓库的其他项目/服务)
修复
1. 回滚恶意变更(git revert,不要 force push 以保留证据)
2. 轮换所有可能泄露的凭据
3. 重新构建和部署受影响的服务
4. 通知下游用户/团队
5. 更新访问控制策略
加固
1. 强制所有账号启用 2FA/MFA
2. 启用提交签名(GPG/SSH 签名)
3. 配置分支保护规则(code review、禁止 force push)
4. 部署 pre-commit hooks 检测凭据泄露
5. CI/CD 中集成 Gitleaks/TruffleHog 扫描
6. 配置 GitHub Secret Scanning / GitLab Secret Detection
7. 定期审计仓库访问权限和 token
8. GitHub Actions 固定到 commit hash,不用 tag
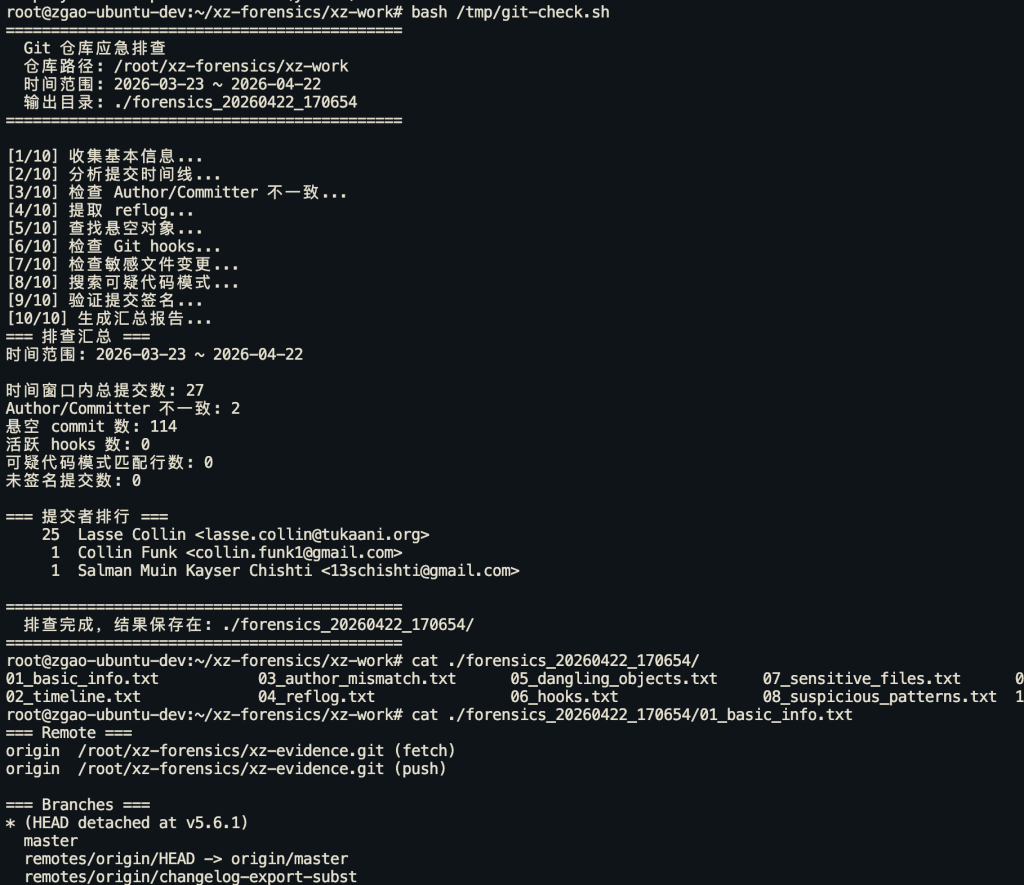
一键排查脚本
最后提供一个实战中可以直接用的排查脚本:
#!/bin/bash
# git_forensics.sh - Git 仓库应急排查脚本
# Usage: ./git_forensics.sh [repo_path] [start_date] [end_date]

set -euo pipefail

# 强制英文 locale —— 让 git/grep 的输出稳定可解析(不然中文系统下抓不到
# 英文关键字如 "dangling commit")
export LC_ALL=C LANG=C

REPO_PATH="${1:-.}"
START_DATE="${2:-$(date -d '30 days ago' +%Y-%m-%d)}"
END_DATE="${3:-$(date +%Y-%m-%d)}"
OUTPUT_DIR="./forensics_$(date +%Y%m%d_%H%M%S)"

mkdir -p "$OUTPUT_DIR"
cd "$REPO_PATH"

# grep -c 在 0 匹配时 exit 1,配合 `|| echo 0` 会导致 "00" 双值。
# 这个 helper 把"空文件 / 0 匹配 / 未找到文件"统一返回单一数字。
count_matches() {
  # $1 = 关键字, $2 = 文件路径
  [ -f "$2" ] || { echo 0; return; }
  grep -c -- "$1" "$2" 2>/dev/null || echo 0
}

echo "============================================"
echo "  Git 仓库应急排查"
echo "  仓库路径: $(pwd)"
echo "  时间范围: $START_DATE ~ $END_DATE"
echo "  输出目录: $OUTPUT_DIR"
echo "============================================"
echo ""

# 1. 基本信息
echo "[1/10] 收集基本信息..."
{
  echo "=== Remote ==="
  git remote -v
  echo ""
  echo "=== Branches ==="
  git branch -a
  echo ""
  echo "=== Tags ==="
  git tag -l
  echo ""
  echo "=== 仓库配置 ==="
  git config -l --local 2>/dev/null || echo "无本地配置"
} > "$OUTPUT_DIR/01_basic_info.txt"

# 2. 提交时间线
echo "[2/10] 分析提交时间线..."
git log --all --since="$START_DATE" --until="$END_DATE" \
  --format="%H | %an <%ae> | %cn <%ce> | %ad | %s" \
  --date=format:"%Y-%m-%d %H:%M:%S" > "$OUTPUT_DIR/02_timeline.txt"

# 3. Author vs Committer 不一致检查(限定在时间窗口内,否则和 timeline 对不上)
echo "[3/10] 检查 Author/Committer 不一致..."
git log --all --since="$START_DATE" --until="$END_DATE" \
  --format="%H|%an|%ae|%cn|%ce|%s" | \
  awk -F'|' '$2 != $4 || $3 != $5 {print "MISMATCH: "$0}' \
  > "$OUTPUT_DIR/03_author_mismatch.txt"

# 4. Reflog 分析
echo "[4/10] 提取 reflog..."
git reflog --all --format="%gd | %gs | %H | %ci" \
  > "$OUTPUT_DIR/04_reflog.txt" 2>/dev/null

# 5. 悬空对象
echo "[5/10] 查找悬空对象..."
git fsck --dangling --no-progress \
  > "$OUTPUT_DIR/05_dangling_objects.txt" 2>&1 || true

# 6. Hooks 检查
echo "[6/10] 检查 Git hooks..."
{
  echo "=== Hook 文件列表 ==="
  ls -la .git/hooks/ 2>/dev/null
  echo ""
  echo "=== 活跃的 Hooks (非 .sample) ==="
  for hook in .git/hooks/*; do
    if [ -f "$hook" ] && [[ ! "$hook" == *.sample ]]; then
      echo "--- $hook ---"
      cat "$hook"
      echo ""
    fi
  done
  echo ""
  echo "=== core.hooksPath ==="
  git config core.hooksPath 2>/dev/null || echo "未设置"
} > "$OUTPUT_DIR/06_hooks.txt"

# 7. 敏感文件变更
echo "[7/10] 检查敏感文件变更..."
{
  echo "=== 构建/部署相关文件变更 ==="
  git log --all --since="$START_DATE" --until="$END_DATE" \
    --diff-filter=ACDMR --name-only --format="commit: %H %s" \
    -- "*.sh" "*.yml" "*.yaml" "Makefile" "Dockerfile*" \
    ".github/workflows/*" "Jenkinsfile" ".gitlab-ci.yml" \
    ".travis.yml" 2>/dev/null
  echo ""
  echo "=== 依赖文件变更 ==="
  git log --all --since="$START_DATE" --until="$END_DATE" \
    --diff-filter=ACDMR --name-only --format="commit: %H %s" \
    -- "package.json" "package-lock.json" "yarn.lock" \
    "requirements.txt" "Pipfile" "Pipfile.lock" \
    "go.mod" "go.sum" "Gemfile" "Gemfile.lock" \
    "pom.xml" "build.gradle" "Cargo.toml" "Cargo.lock" 2>/dev/null
  echo ""
  echo "=== 已删除的敏感文件 ==="
  git log --all --diff-filter=D --name-only --format="commit: %H" \
    -- "*.pem" "*.key" "*.p12" "*.pfx" "*.env" \
    "*credentials*" "*secret*" "*password*" 2>/dev/null
} > "$OUTPUT_DIR/07_sensitive_files.txt"

# 8. 可疑代码模式
echo "[8/10] 搜索可疑代码模式..."
{
  for pattern in "eval(" "exec(" "subprocess" "os.system" \
    "child_process" "Runtime.getRuntime" \
    "curl " "wget " "/dev/tcp" "base64" \
    "nc -e" "bash -i" "powershell" \
    "FromBase64String"; do
    result=$(git log --all --since="$START_DATE" --until="$END_DATE" \
      -S "$pattern" --oneline 2>/dev/null)
    if [ -n "$result" ]; then
      echo "=== Pattern: $pattern ==="
      echo "$result"
      echo ""
    fi
  done
} > "$OUTPUT_DIR/08_suspicious_patterns.txt"

# 9. 签名验证
echo "[9/10] 验证提交签名..."
git log --all --since="$START_DATE" --until="$END_DATE" \
  --format="%H | %G? | %GS | %an | %s" \
  > "$OUTPUT_DIR/09_signatures.txt" 2>/dev/null

# 10. 统计汇总
echo "[10/10] 生成汇总报告..."
{
  echo "=== 排查汇总 ==="
  echo "时间范围: $START_DATE ~ $END_DATE"
  echo ""

  total_commits=$(wc -l < "$OUTPUT_DIR/02_timeline.txt" 2>/dev/null || echo 0)
  echo "时间窗口内总提交数: $total_commits"

  mismatches=$(count_matches "MISMATCH" "$OUTPUT_DIR/03_author_mismatch.txt")
  echo "Author/Committer 不一致: $mismatches"

  # LC_ALL=C 已确保 git fsck 输出英文 'dangling commit'
  danglings=$(count_matches "dangling commit" "$OUTPUT_DIR/05_dangling_objects.txt")
  echo "悬空 commit 数: $danglings"

  active_hooks=$(find .git/hooks -type f ! -name "*.sample" 2>/dev/null | wc -l || echo 0)
  echo "活跃 hooks 数: $active_hooks"

  # 用 awk 替代 grep(awk 无匹配也 exit 0,不会触发 pipefail 导致的双 0 问题)
  # 排除"=== Pattern: ..."标题行和空行
  if [ -f "$OUTPUT_DIR/08_suspicious_patterns.txt" ]; then
    suspicious=$(awk '!/^=== Pattern:/ && NF' "$OUTPUT_DIR/08_suspicious_patterns.txt" | wc -l)
  else
    suspicious=0
  fi
  echo "可疑代码模式匹配行数: $suspicious"

  if [ -f "$OUTPUT_DIR/09_signatures.txt" ]; then
    unsigned=$(awk '/ N /' "$OUTPUT_DIR/09_signatures.txt" | wc -l)
  else
    unsigned=0
  fi
  echo "未签名提交数: $unsigned"

  echo ""
  echo "=== 提交者排行 ==="
  git shortlog -s -n -e --all --since="$START_DATE" --until="$END_DATE"
} > "$OUTPUT_DIR/10_summary.txt"

cat "$OUTPUT_DIR/10_summary.txt"

echo ""
echo "============================================"
echo "  排查完成,结果保存在: $OUTPUT_DIR/"
echo "============================================"
总结
代码仓库的安全不是装个工具就完事的事情。从这些真实案例中可以看到:
- 攻击者可以非常有耐心(xz-utils 花了两年半)
- 看似无害的改动可能是后门(”Fix typo” commit)
- 构建环境和源码同等重要(SolarWinds)
- 依赖链就是攻击面(event-stream、ua-parser-js)
- Docker 镜像层会泄露 secret(Codecov)
- 没有 2FA 的账号迟早被打(几乎所有 npm 劫持案例)
应急响应不是靠临场发挥,靠的是平时把流程和工具准备好。希望这篇文章中的命令和思路能在你需要的时候派上用场。当然,最好的应急是不需要应急——把安全左移到开发流程中去。
本文所有命令均在 Git 2.40+ 和 SVN 1.14+ 环境下测试通过。如有勘误或补充,欢迎交流。
赞赏 微信赞赏
微信赞赏 支付宝赞赏
支付宝赞赏
发表评论