一些学习中的随笔小记(四)
错误:the input device is not a TTY
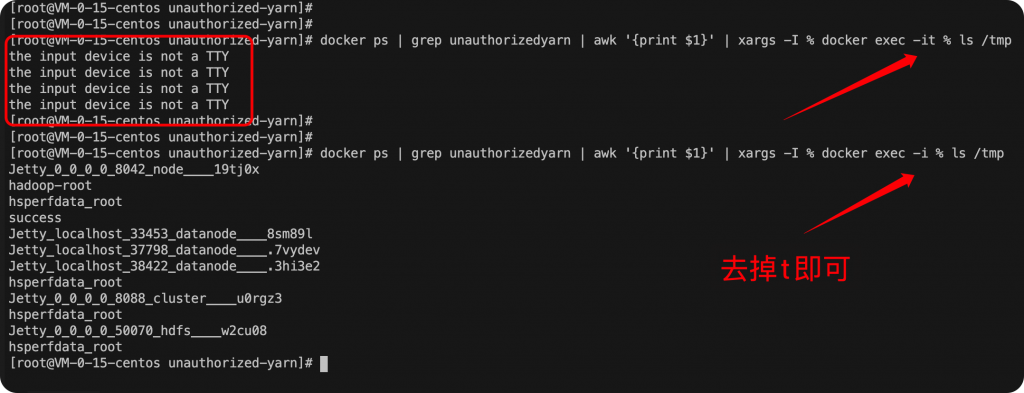
【报错】:
the input device is not a TTY
【解决方法】:
docker exec -i (去掉-t)
因为-t是指分配一个伪终端。这里不需要分配伪终端。
Docker容器时间如何与宿主机同步?
如果在启动Docker容器的过程中没有单独配置localtime,很可能造成Docker容器时间与主机时间不一致的情况,比如UTC和CST相差8小时。
# 查看主机时间
[root@localhost ~]# date
2020年07月27日 星期三 22:42:44 CST

# 查看容器时间
# docker exec -it <containerid> /bin/sh
root@b43340ecf5ef:/# date
Wed Jul 27 14:43:31 UTC 2020
可以发现,他们相隔了8小时。CST应该是指(China Shanghai Time,东八区时间) UTC应该是指(Coordinated Universal Time,标准时间) 所以,这2个时间实际上应该相差8个小时
docker run 添加时间参数
-v /etc/localtime:/etc/localtime

# 实例1
docker run -p 3306:3306 --name mysql -v /etc/localtime:/etc/localtime

# 实例2
docker run \
    --detach \
    --restart always \
    --name 'scribe' \
    --publish 11315:11315 \
    --mount type=bind,source=/data/gop/,destination=/data/gop/,consistency=consistent \
    -v /etc/localtime:/etc/localtime \
    wsgzao/facebook-scribe
Dockerfile
# 方法1
# 添加时区环境变量,亚洲,上海
ENV TimeZone=Asia/Shanghai
# 使用软连接,并且将时区配置覆盖/etc/timezone
RUN ln -snf /usr/share/zoneinfo/$TimeZone /etc/localtime && echo $TimeZone > /etc/timezone

# 方法2
# CentOS
RUN echo "Asia/shanghai" > /etc/timezone
# Ubuntu
RUN cp /usr/share/zoneinfo/Asia/Shanghai /etc/localtime
docker-compose
#第一种方式(推荐):
environment:
  TZ: Asia/Shanghai

#第二种方式:
environment:
  SET_CONTAINER_TIMEZONE=true
  CONTAINER_TIMEZONE=Asia/Shanghai

#第三种方式:
volumes:
  - /etc/timezone:/etc/timezone
  - /etc/localtime:/etc/localtime
宿主机直接执行命令给某个容器同步时间
# 方法1:直接在宿主机操作
docker cp /etc/localtime 【容器ID或者NAME】:/etc/localtime
docker cp -L /usr/share/zoneinfo/Asia/Shanghai 【容器ID或者NAME】:/etc/localtime

# 方法2:登录容器同步时区timezone
ln -sf /usr/share/zoneinfo/Asia/Singapore /etc/localtime
Linux 利用 iptables 屏蔽域名请求
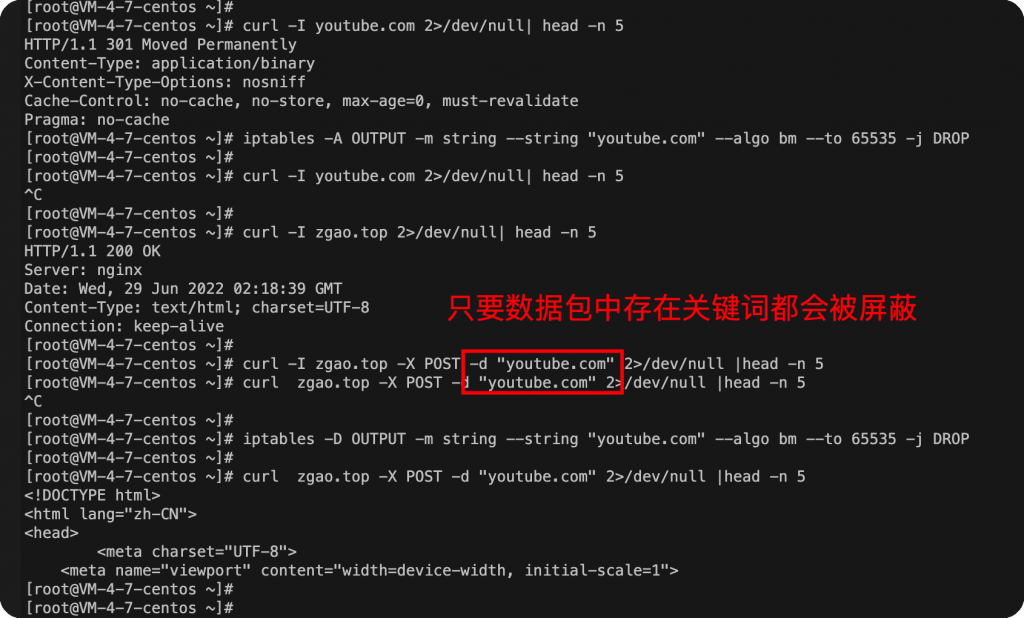
一般 iptables 自带的都有 string 模块,这个模块的作用就是匹配字符串,匹配到泛域名的 URL,然后就把数据包丢弃,就实现了屏蔽泛域名的功能。比如可以限制科学上网访问 youtube.com。
示例:
 以下规则是屏蔽以 youtube.com 为主的所有一级 二级 三级等域名。

iptables -A OUTPUT -m string --string "youtube.com" --algo bm --to 65535 -j DROP
 # 添加屏蔽规则

iptables -D OUTPUT -m string --string "youtube.com" --algo bm --to 65535 -j DROP
 # 删除屏蔽规则,上面添加的代码是什么样,那么删除的代码就是把 -A 改成 -D
参数解释:
-A
 # 添加iptables规则;
 -D
 # 删除iptables规则(把添加防火墙规则时代码中的 -A 改成 -D 即可删除添加的规则);
 -m string
 # 指定模块;
 --string "youtube.com"
 # 指定要匹配的字符串(域名、关键词等);
 --algo bm
 # 指定匹配字符串模式/算法(还有一种更复杂的算法:kmp);
 --to 65535
 # 指定端口,这里代表所有端口(1-65535);
 -j DROP
 # 指匹配到数据包后处理方式,这里是丢弃数据包。
这个模块的作用就是匹配字符串,这个字符串可以是URL、普通文本、文件后缀(后两者时,如果目标网站启用了GZIP类压缩算法,就会无法过滤匹配,毕竟都压缩了)比如: .zip ,就会把包含 .zip 的数据库丢弃,这样就会无法下载 .zip 类型的文件了。
但是这种方法并不靠谱,这种方式是匹配数据包的所有内容,存在关键字都会drop掉。
iptables -D OUTPUT -p tcp -d www.baidu.com –dport 443 -j DROP
这种方式添加的也不靠谱,iptables实际上还是将域名解析为ip再添加规则。

iptables 禁止访问指定 IP段
如果想要禁止访问某个IP,例如:1.1.1.0这个IP段,使用以下命令:iptables -I INPUT -s 1.1.1.0/24 -j DROP
如果想要禁止访问某个IP,例如:1.1.0.0这个IP段,使用以下命令:iptables -I INPUT -s 1.1.0.0/16 -j DROP
如果想要禁止访问某个IP,例如:1.0.0.0这个IP段,使用以下命令:iptables -I INPUT -s 1.0.0.0/8 -j DROP
iptables 限制只能访问指定IP
1.首先,要添加一个允许访问的IP,如192.168.1.1,使用以下命令:iptables -I INPUT -s 192.168.1.1 -j ACCEPT
2.然后,设置禁止访问所有IP,使用以下命令:iptables -I INPUT -s 0.0.0.0/8 -j DROP
iptables 也会进行域名解析?

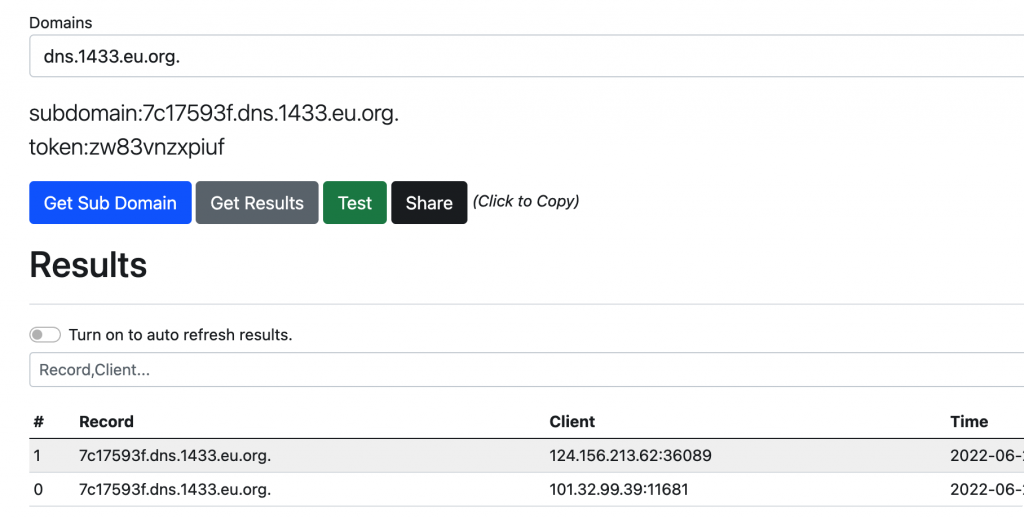
测试发现iptables禁用域名,实际是将域名解析后的ip进行禁用,无法达到真正的效果。
grep 正则问题 this version of PCRE is compiled without UTF support
有些系统支持的正则规范不同。

发现有些老的系统如centos6就不支持-P的正则。
使用egrep或grep –E 代替即可。
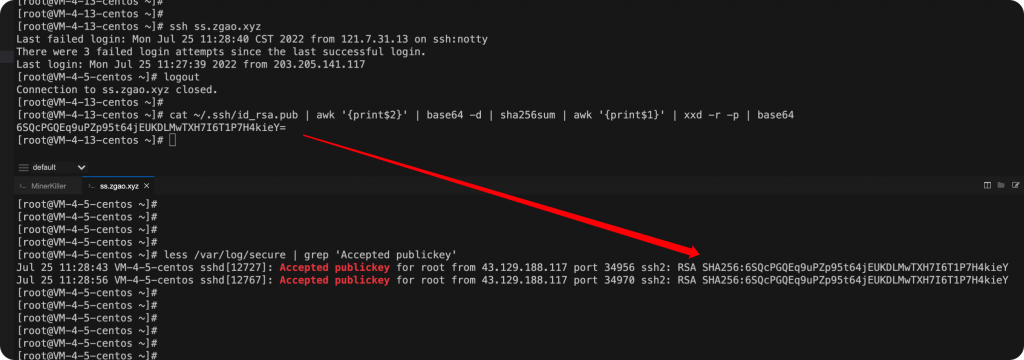
判断ssh连接日志中的公私钥是否匹配
cat ~/.ssh/id_rsa.pub | awk '{print$2}' | base64 -d | sha256sum | awk '{print$1}' | xxd -r -p | base64
yum清理缓存
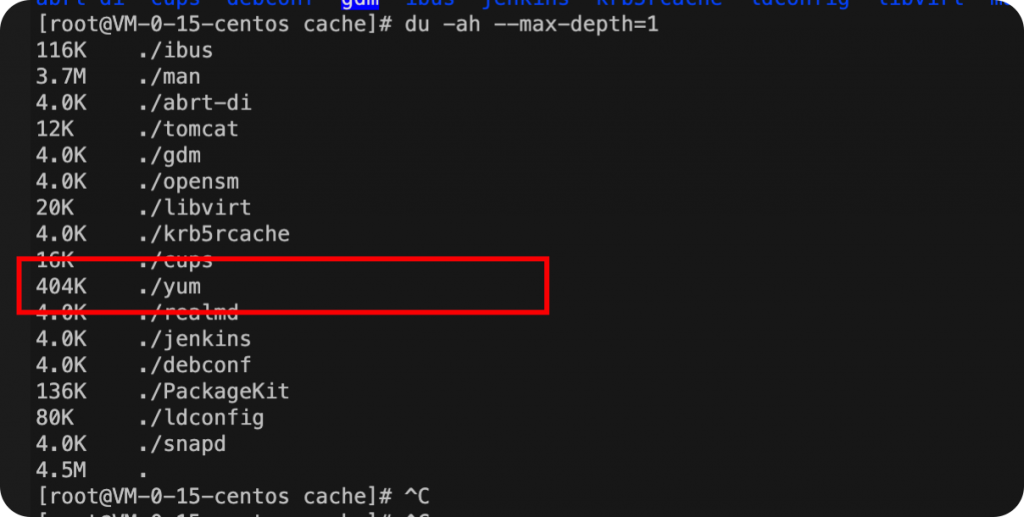
最近发现机器磁盘满了,看了下是yum缓存占了几十个G。
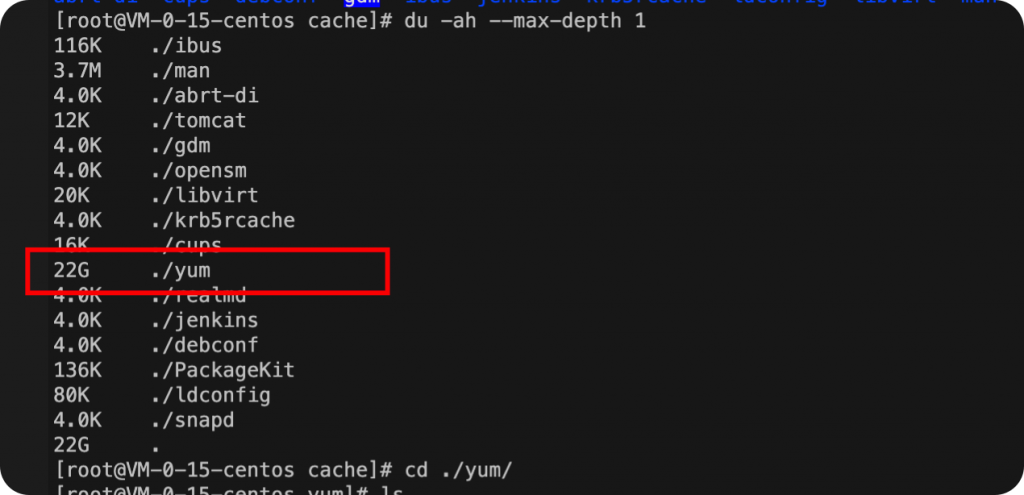
yum clean all
linux上安装java工具 jstat jinfo等命令
1)搜索openjdk-devel相关的安装包
yum search java|grep jdk
2)安装对应的版本
yum install -y java-1.8.0-openjdk-devel.x86_64
使用wget递归下载某目录下的所有文件
wget -c -r -nd -np -k -L -p -A c,h www.xxx.org/pub/path/
- -c 断点续传
- -r 递归下载,下载指定网页某一目录下(包括子目录)的所有文件
- -nd 递归下载时不创建一层一层的目录,把所有的文件下载到当前目录
- -np 递归下载时不搜索上层目录。
如wget -c -r www.xxx.org/pub/path/ 没有加参数-np,就会同时下载path的上一级目录pub下的其它文件
- -k 将绝对链接转为相对链接,下载整个站点后脱机浏览网页,最好加上这个参数
- -L 递归时不进入其它主机,如wget -c -r www.xxx.org/ 如果网站内有一个这样的链接: www.yyy.org,不加参数-L,会递归下载www.yyy.org网站
- -p 下载网页所需的所有文件,如图片等
- -A 指定要下载的文件样式列表,多个样式用逗号分隔
- -i 后面跟一个文件,文件内指明要下载的URL。
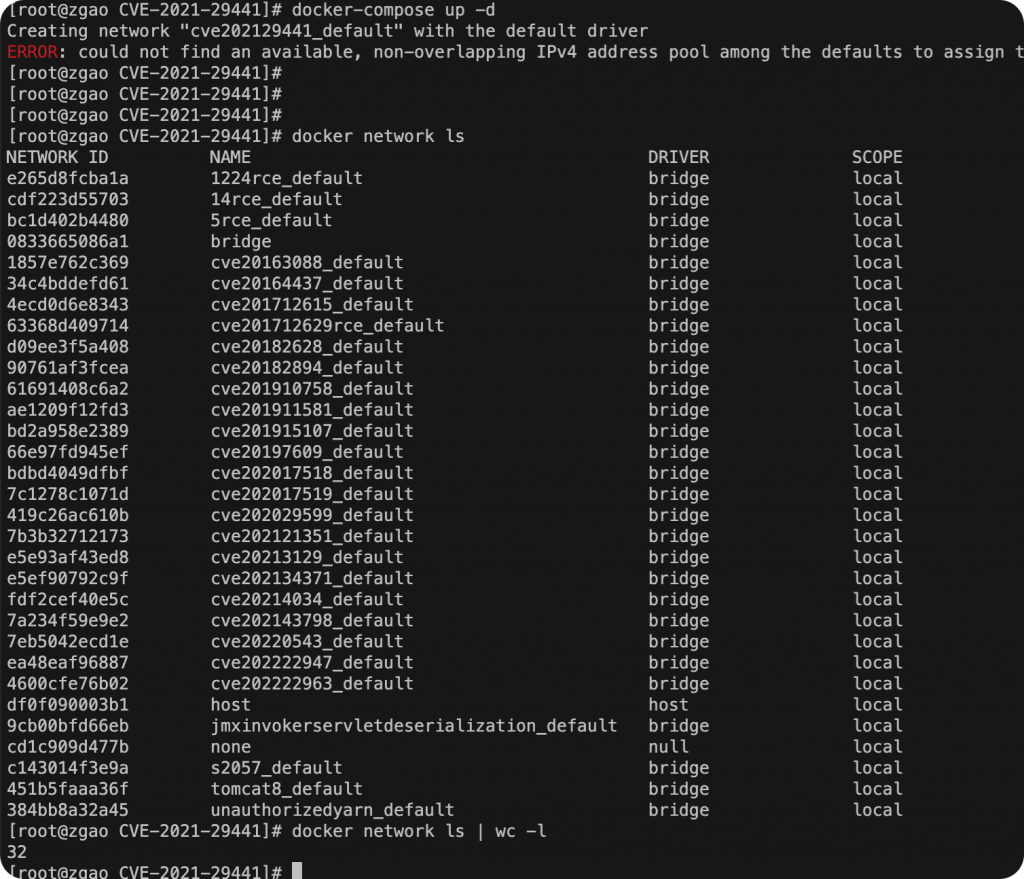
docker 报错 non-overlapping IPv4 address pool among the defaults to assign to the network 解决方法
Docker默认支持30个不同的自定义bridge网络,如果超过这个限制,就会提示上面的错误。
使用命令 docker network ls 来查看创建的网络。
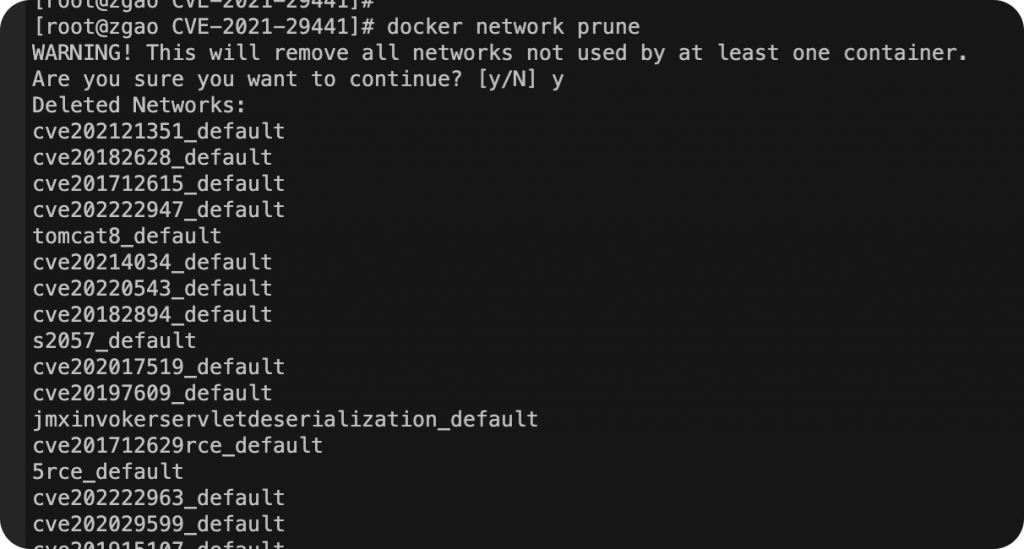
删除没使用的网络
docker network prune
修改docker默认网络地址(推荐)
在 /etc/docker/daemon.json 追加
{
    ...
    "default-address-pools":[
        {"base":"172.20.0.0/16","size":24},
        {"base":"172.21.0.0/16","size":24},
        {"base":"172.22.0.0/16","size":24},
        {"base":"172.23.0.0/16","size":24}
    ]
}
注意 配置中的 “…” 是配置原本的其他内容,如果没有 /etc/docker/daemon.json 文件则新建 加入 default-address-pools 的配置即可。这个配置将允许Docker分配一下地址。
- 172.20.[0-255].0/24
- 172.21.[0-255].0/24
- 172.22.[0-255].0/24
- 172.23.[0-255].0/24
每个网络允许访问256个地址,总共1024个网络。
加入后需要 删除现有网络占用
docker network prune
然后重启docker服务
service docker restart
查看docker 容器是否在特权模式下运行
docker inspect --format='{{.HostConfig.Privileged}}' <容器id>

获取所有容器,判断是否为特权模式。
docker ps -a | awk 'NR>1{print $1}' | xargs -I % docker inspect --format='{{.HostConfig.Privileged}}' %
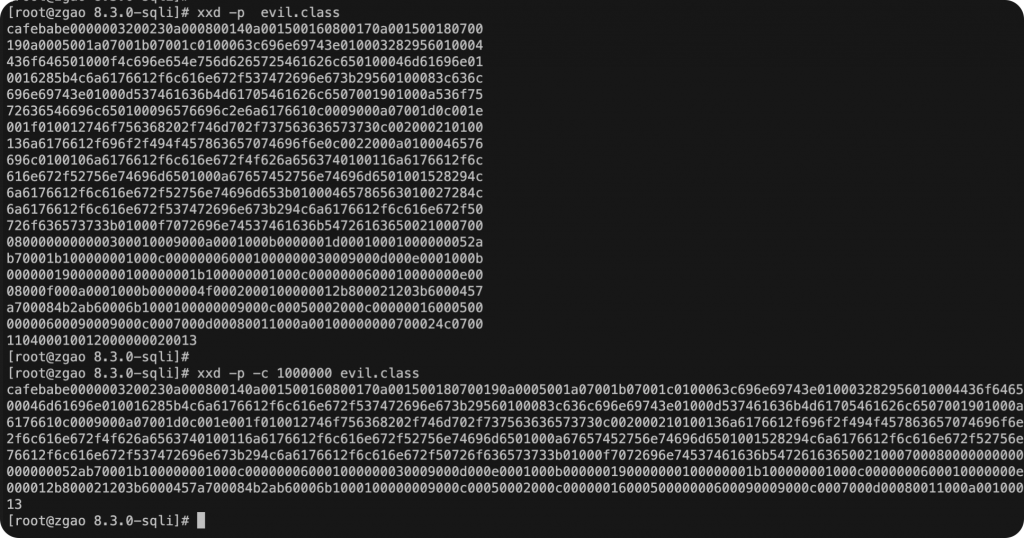
无换行符的 XXD 输出
默认xxd输出16进制会有换行符。
-c 列 | -cols cols 格式化每行八位字节。默认 16(-i:12,-ps:30,-b:6)。最大 256。
文档说“c”参数的最大值是 256,但尝试了更大的值就可以输出在一行了。
“grep -R”时如何避免检查二进制文件
“grep -R”时遭遇二进制文件,提示 grep: some.bin: binary file matches 有啥办法不让grep检查二进制文件?
grep -RI <dir>
grep -R --binary-files=without-match <dir>
sed 将一个文件的内容到追加到另一个文件的中间
sed -i '10r ./yesterday.log' today.log
表示将 yesterday.log 文件中的内容添加到 today.log 文件中,且从第10行往后开始添加。
如何在宿主机上直接编辑docker容器内的文件
docker内的文件默认在宿主机上的 /var/lib/docker/volumes/[id] 路径下面。
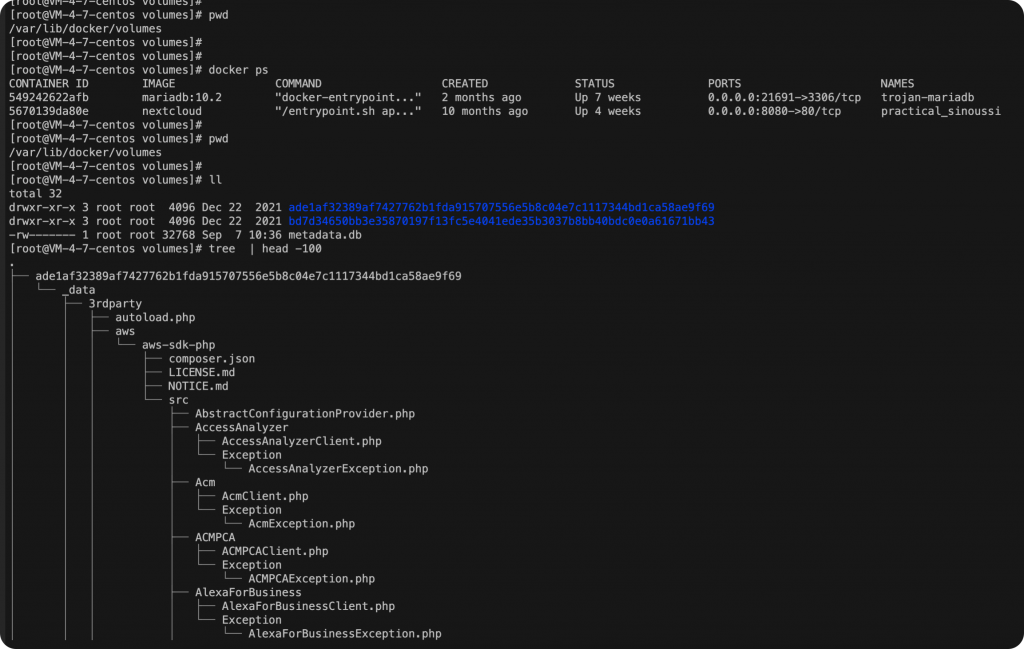
直接编辑即可修改容器中的文件,无需进入容器。
ssh 告警 “WARNING: UNPROTECTED PRIVATE KEY FILE!”
告警如下:
@@@@@@@@@@@@@@@@@@@@@@@@@@@@@@@@@@@@@@@@@@@@@@@@@@@@@@@@@@@
@         WARNING: UNPROTECTED PRIVATE KEY FILE!          @
@@@@@@@@@@@@@@@@@@@@@@@@@@@@@@@@@@@@@@@@@@@@@@@@@@@@@@@@@@@
Permissions 0744 for '/home/geek/.ssh/id_rsa' are too open.
It is recommended that your private key files are NOT accessible by others.
This private key will be ignored.
bad permissions: ignore key: /home/geek/.ssh/id_rsa
解决方式:
sudo chmod 600 ~/.ssh/id_rsa
sudo chmod 600 ~/.ssh/id_rsa.pub

Are you sure you want to continue connecting (yes/no)? yes
Failed to add the host to the list of known hosts (/home/geek/.ssh/known_hosts).

sudo chmod 644 ~/.ssh/known_hosts
sudo chmod 755 ~/.ssh
ssh无法登录,提示Pseudo-terminal will not be allocated because stdin is not a terminal.
当远程通过ssh登录主机时出现Pseudo-terminal will not be allocated because stdin is not a terminal. 错误 字面意思是伪终端将无法分配,因为标准输入不是终端。
所以需要增加-t -t参数来强制伪终端分配,即使标准输入不是终端。to force pseudo-tty allocation even if stdin isn’t a terminal.
参考样例如下:
ssh -tt user1@host1 -p 2222
ssh忽略首次连接新建服务器The authenticity of host ‘xxx (xxx)’ can’t be established.确认提示的方法
新创建的服务器初次使用ssh去连接时,会弹出 The authenticity of host ‘xxx (xx)’ can’t be established.的确认提示,需要手工输入yes/no 确认是否连接。
在ssh连接命令行中添加
-o StrictHostKeyChecking=no
就可以忽略这个手工敲yes的步骤。
docker-compose报错The Compose file ‘./docker-compose.yml’ is invalid
从网上拉取的docker-compose.yml文件,执行报错。
[root@zgao 5_debug]# docker-compose up -d
ERROR: The Compose file './docker-compose.yml' is invalid because:
Unsupported config option for services: 'fpm'
升级版本即可,查看当前版本。
# docker-compose -v
docker-compose version 1.18.0, build 8dd22a9
# whereis docker-compose
docker-compose: /usr/bin/docker-compose
下载新版本。
curl -L https://github.com/docker/compose/releases/download/1.27.4/docker-compose-`uname -s`-`uname -m` -o /usr/bin/docker-compose chmod +x /usr/bin/docker-compose # docker-compose -v docker-compose version 1.27.4, build 40524192赞赏
 微信赞赏
微信赞赏 支付宝赞赏
支付宝赞赏
发表评论